
PHILIPS HD4713/40 Multicooker – Instrukcja obsługi w formacie pdf, czytaj online za darmo. Mamy nadzieję, że okaże się ona pomocna w przypadku jakichkolwiek pytań związanych z użytkowaniem urządzenia.
Jeśli nadal masz wątpliwości, zadaj pytanie w komentarzach pod instrukcją.
"Ładowanie instrukcji" oznacza, że musisz poczekać na pobranie pliku, aby móc go przeczytać online. Niektóre instrukcje są bardzo obszerne, a czas ich ładowania zależy od szybkości łącza internetowego.


English
1 Important
Read this user manual carefully before you use the Multi cooker and save it
for future reference.
Danger
•
The appliance must not be immersed.
Warning
•
This appliance shall not be used by children from 0 year to 8 years.
•
This appliance can be used by children aged from 8 years and above if
they are continuously supervised and they have been given supervision or
instruction concerning use of the appliance in a safe way and understand
the hazards involved.
•
This appliance can be used by people with reduced physical, sensory or
mental capabilities or lack of experience and knowledge if they have been
given supervision or instruction concerning use of the appliance in a safe
way and understand the hazards involved.
•
Keep the appliance and its cord out of reach of children aged less than 8
years.
•
Cleaning and user maintenance shall not be made by children unless they
are older than 8 and supervised.
•
Children shall not play with the appliance.
•
This appliance should be positioned in a stable situation with the handles
(if any) positioned to avoid spillage of the hot liquids.
•
This appliance is intended to be used in household and similar applications
such as:
•
Staff kitchen areas in shops, offices and other working environments;
•
Farm houses;
•
By clients in hotels, motels and other residential type environments;
•
Bed and breakfast type environments.
•
If the power cord set is damaged, it must be replaced by a cord set
available from the manufacturer.
•
The appliance is not intended to be operated by means of an external
timer or a separate remote-control system.
•
Check if the voltage indicated on the appliance corresponds to the local
power voltage before you connect it.
•
Do not let the power cord hang over the edge of the table or worktop on
which the appliance stands.
•
Make sure the heating element and the outside of the inner pot are clean
and dry before you put the plug in the power outlet.
•
Do not plug in the appliance or press any of the buttons on the control
panel with wet hands.
•
WARNING: Make sure to avoid spillage on the power connector to avoid a
potential hazard.
•
WARNING: Always follow the instructions and use the appliance properly
to avoid potential injury.
•
According to the instructions prescribed in this user manual, use a soft
damp cloth to clean the surfaces in contact with food and make sure to
remove all the food residues stuck to the appliance.
•
Don’t place the power cord under the appliance when in use.
•
When placing the steaming basket, avoid touching the side wall of the
inner pot, otherwise it may cause deformation due to high temperature.
Caution
•
CAUTION: Surface of the heating element is subject to residual heat after
use.
•
Never use any accessories or parts from other manufacturers or that Philips
does not specifically recommend. If you use such accessories or parts, your
guarantee becomes invalid.
•
Do not expose the appliance to high temperatures, nor place it on a
working or still hot stove or cooker.
•
Do not expose the appliance to direct sunlight.
•
Place the appliance on a stable, horizontal, and level surface.
•
Always put the inner pot in the appliance before you put the plug in the
power outlet and switch it on.
•
Do not place the inner pot directly over an open fire to cook rice.
•
Do not use the inner pot if it is deformed.
•
The accessible surfaces may become hot when the appliance is operating.
Take extra caution when touching the appliance.
•
Beware of hot steam coming out of the steam vent during cooking or out
of the appliance when you open the lid. Keep hands and face away from
the appliance to avoid the steam.
•
Do not lift and move the appliance while it is operating.
•
Do not exceed the maximum water level indicated in the inner pot to
prevent overflow which might cause potential hazard.
•
Do not place the cooking utensils inside the pot while cooking, keeping
warm or reheating rice.
© 2022 Philips Domestic Appliances Holding B.V.
All rights reserved.
6608.000.0806.5 (18/03/2022)
•
Only use the cooking utensils provided. Avoid using sharp utensils.
•
To avoid scratches, it is not recommended to cook ingredients with
crustaceans and shellfish. Remove the hard shells before cooking.
•
Do not insert metallic objects or alien substances into the steam vent.
•
Do not place a magnetic substance on the lid. Do not use the appliance
near a magnetic substance.
•
Always let the appliance cool down before you clean or move it.
•
Always clean the appliance after use. Do not clean the appliance in a
dishwasher.
•
Always unplug the appliance if not used for a longer period.
•
If the appliance is used improperly or for professional or semiprofessional
purposes, or if it is not used according to the instructions in this user
manual, the guarantee becomes invalid and Philips refuses liability for any
damage caused.
Electromagnetic fields (EMF)
This Philips appliance complies with all applicable standards and regulations
regarding exposure to electromagnetic fields.
2 Your Multi cooker
Congratulations on your purchase, and welcome to Philips!
To fully benefit from the support that Philips offers, register your product at
www.philips.com/welcome
.
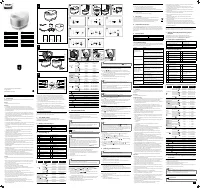
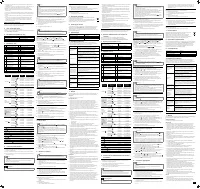
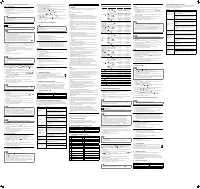
3 What’s in the box (fig. 1)
Multi cooker main unit
Measuring cup
Rice and soup 2 in 1 spoon
Power cord
Steaming basket
User manual
Recipe book
Warranty card
4 Overview (fig. 2)
a
Top lid
f
Power socket
b
Detachable inner lid
g
Lid release button
c
Inner pot
h
Steam vent
d
Water level indications
i
Steam vent cap
e
Control panel
j
Steam valve
Controls overview (fig. 3)
k
Stew cooking buton
s
Time display
l
Slow cook Low button
t
Menu selection button
m
Keep warm/Cancel button
u
Reheat button
n
Steam cooking button
v
Cooking time/delay start/
temperature selection button
o
Slow cook High button
w
Confirm button
p
Bake button
x
Sauté button
q
Timer indicator
y
Menu selection button
r
Delay start indicator
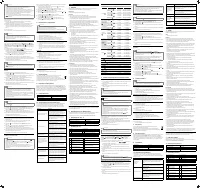
Cooking program
Cooking
function
Sub cooking
function
Default
cooking time
Adjustable cooking
time
Stew
Beef ( )
120 minutes
20 minutes-4 hours
Poultry ( )
60 minutes
20 minutes-4 hours
Pork ( )
120 minutes
20 minutes-4 hours
Lamb ( )
120 minutes
20 minutes-4 hours
Seafood ( )
25 minutes
20 minutes-4 hours
Manual ( )
30 minutes
20 minutes-4 hours
Steam
coking
Beef ( )
60 minutes
5-120minutes
Poultry ( )
50 minutes
5-120minutes
Pork ( )
30 minutes
5-120minutes
Lamb ( )
40 minutes
5-120minutes
Seafood ( )
20 minutes
5-120minutes
Manual ( )
25 minutes
5-120minutes
Slow cook
Low
Beef ( )
12 hours
1-15 hours
Poultry ( )
10 hours
1-15 hours
Pork ( )
10 hours
1-15 hours
Lamb ( )
10 hours
1-15 hours
Seafood ( )
8 hours
1-15 hours
Manual ( )
2 hours
1-15 hours
Slow cook
High
Beef ( )
6 hours
1-15 hours
Poultry ( )
4 hours
1-15 hours
Pork ( )
4 hours
1-15 hours
Lamb ( )
4 hours
1-15 hours
Seafood ( )
2 hours
1-15 hours
Manual ( )
2 hours
1-15 hours
Baking
Beef ( )
50 minutes
10-120 minutes
Poultry ( )
30 minutes
10-120 minutes
Pork ( )
25 minutes
10-120 minutes
Lamb ( )
50 minutes
10-120 minutes
Seafood ( )
20 minutes
10-120 minutes
Manual ( )
20 minutes
10-120 minutes
Rice
45 minutes
NA
Soup
90 minutes
20 minutes-4 hours
Porridge
25 minutes
10 minutes-2 hours
Beans
80 minutes
1-2 hours
Cabbage rolls
50 minutes
20-59 minutes
Yogurt
8 hours
6-12 hours
Sauté
30 minutes
10-59 minutes
Reheat
25 minutes
5-59 minutes
Keep warm
24 hours
NA
5 Using the Multi cooker
Before first use
1
Take out all the accessories from the inner pot. Remove the packaging
material of the inner pot.
2
Before first use, boil water and clean the Multi cooker.
3
Clean the parts thoroughly before using it for the first time (see chapter
“Cleaning and Maintenance”).
Note
•
Make sure all parts are completely dry before you start using the Multi
cooker.
•
Make sure that the outside of the inner pot is dry and clean, and that
there is no foreign residue on the inside of the appliance.
Preparation before cooking
Warning
•
Make sure that the detachable inner lid is properly installed.
Note
•
Do not fill the inner pot with food and liquid less than the minimum of
the water level indications, or more than the maximum of the water
level indications.
•
For rice cooking, follow the water level indications on the inside of
the inner pot. You can adjust the water level for different types of rice
and according to your own preference. Do not exceed the maximum
quantities indicated on the inside of the inner pot.
•
After the cooking process is started, you can press / to terminate the
current work, and the appliance goes to menu selection mode.
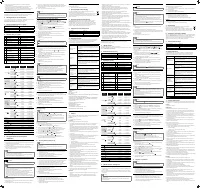
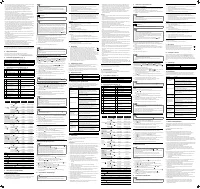
Perform the following preparations before cooking with the Multi cooker:
1
Press the lid release button to open the Multi cooker(fig. 4).
2
Take out the inner pot from the All-in-One cooker (fig. 5).
3
Put the pre-washed food in the inner pot, wipe the outside and bottom
of the inner pot dry with soft cloth, then put it back into the All-in-One
cooker (fig. 6).
4
Close the lid.
5
Put the plug into the power socket (fig. 7).
Note
•
Make sure the outside of the inner pot is dry and clean, and that there is
no foreign residue on the heating element.
•
Make sure the inner pot is in proper contact with the heating element.
Stew/Steam/Slow cooking/Bake
There are 5 cooking function:
Stew
,
Steam
,
Slow cook Low
,
Slow cook High
and
Bake
. Each of them has 6 sub menus available.
For cooking time range, refer to Chapter "Cooking program".
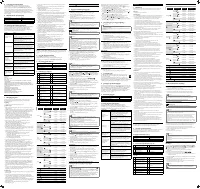
1
Follow the steps in "Preparations before cooking".
2
Press one of the buttons / / / / repeatedly to select on of the
cooking menus (fig. 8).
»
The indicator chosen cooking function lights up, the default cooking
time is displayed on the screen.
3
Press
to confirm, the Mutil cooker starts working in the selected mode.
4
When the cooking is finished, you will hear 4 beeps and the selected
cooking function light will be off.
5
The Multi cooker will be in keep-warm mode automatically.
»
The keep-warm indicator lights up.
HD4713
Note
•
After the cooking process is started, you can press / to terminate the
current work, and the appliance goes to menu selection mode.
Rice/Soup/Porridge/Beans/Cabbage rolls/Yogurt
1
Follow the steps in “Preparations before cooking”.
2
Press the or
to select the cooking function you need (fig. 9).
»
The indicator chosen cooking function lights up, the default cooking
time is displayed on the screen.
3
Press
to confirm, the Mutil cooker starts working in the selected mode.
4
When the cooking is finished, you will hear 4 beeps and the selected
cooking function light will be off.
5
The Multi cooker will be in keep-warm mode automatically.
»
The keep-warm indicator lights up.
Note
•
The level marked inside the inner pot is just an indication. You can
always adjust the water level for different types of grains and your own
preference.
•
Besides following the water level indications, you may also add rice and
water at 1:1-1:3 ratio for rice cooking.
•
Do not exceed the volume indicated or exceed the maximum water
level, as this may cause the appliance to overflow.
Sauté
Note
•
Keep the lid open when using the Sauté function.
1
Follow the steps in “Preparations before cooking”.
2
Press to select
Sauté
function (fig. 10).
3
Press
to confirm, the Mutil cooker starts working in the selected mode.
4
When the cooking is finished, you will hear 4 beeps and the selected
cooking function light will be off.
5
The Multi cooker will be in keep-warm mode automatically.
»
The keep-warm indicator lights up.
Reheating
1
Loosen the cooled food and evenly distribute it in the inner pot.
2
Pour some water onto the food to prevent it from becoming too dry. The
quantity of the water depends on the amount of food.
3
Press to select
Reheat
function (fig. 11).
4
Press
to confirm, the Multi cooker starts working in the selected mode.
5
When the cooking is finished, you will hear 4 beeps and the selected
cooking function light will be off.
6
The Multi cooker will be in keep-warm mode automatically.
»
The keep-warm indicator lights up.
Adjust the cooking temperature, cooking time, and delay
start
Note
•
You can adjust the temperature only for
Bake
and
Sauté
.
•
You cannot adjust the cooking time for
Rice
.
•
You can set the delay start time from 1- 24 hours for all cooking functions.
•
The cooking process will be finished by the time the delay start time has
elapsed. If the preset time you set is shorten than the cooking time, the
appliance will start the cooking process immediately.
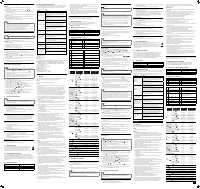
You can adjust the cooking time, temperature and delay start during the
menu selection.
1
After you choose a desired function, press to set the cooking
temperature (fig. 12).
»
The temperature indicator displays on the screen.
2
Press the or
to adjust the temerature (fig. 13). There are 4 levels
available: 100°C, 120°C, 140°C and 160°C.
3
Press to set the cooking time, press the or to adjust the cooking
time (fig. 14).
»
The timer indicator displays on the screen.
4
Press
to set the delay start time (fig. 15), press the
or to adjust
»
The delay start indicator displays on the screen.
5
Press
to confirm. The All-in-One cooker starts working in the selected
mode.
6 Cleaning and Maintenance
Note
•
Unplug the Multi cooker before starting to clean it.
•
Wait until the Multi cooker has cooled down sufficiently before cleaning it.
Inner lid
•
Pull the inner lid out outwards to remove it from the top lid for cleaning
(fig. 16).
•
Soak in hot water and clean with sponge.
•
Make sure to remove all the food residues stuck to the Multi cooker.
•
Re-install the inner lid back to the top lid.
Steam vent cap
•
Follow the above steps to disassemble the inner lid.
•
Disassemble the steam vent cap from the inner lid (fig. 17).
•
Clean the steam vent cap under tap water (fig. 18). Make sure no food
residue is left. Reassemble the steam box to the inner lid after cleaning
is completed (fig. 19).
Interior
Inside of the top lid and the main body:
•
Wipe with a damp cloth.
•
Make sure to remove all the food residues stuck to the Multi cooker.
Heating element:
•
Wipe with a damp cloth.
•
Remove food residues with a damp cloth.
Exterior
Surface of the top lid and outside of the main body:
•
Wipe with a cloth damped with soap water.
•
Only use soft and dry cloth to wipe the control panel.
•
Make sure to remove all the food residues around the control panel.
Accessories
Spatula and inner pot:
•
Soak in hot water and clean with sponge.
7 Recycling
This symbol means that this product shall not be disposed of with
normal household waste (2012/19/EU).
Follow your country’s rules for the separate collection of electrical
and electronic products. Correct disposal helps prevent negative
consequences for the environment and human health.
8 Guarantee and service
If you need service or information, or if you have a problem, visit the Philips
website at
www.philips.com
or contact the Philips Customer Care Center
in your country. You can find its phone number in the worldwide guarantee
leaflet. If there is no Customer Care Center in your country, go to your local
Philips dealer.
9 Specifications
Model Number
HD4713
Rated power input
896-1067W
Rated capacity
5.0L
Rice capacity
1.8L
10 Troubleshooting
If you encounter problems when using this Multi cooker, check the following
points before requesting service. If you cannot solve the problem, contact the
Philips Consumer Care Center in your country.
Problem
Solution
The light on the
button does not go
on.
There is a connection problem. Check if the power
cord is connected to the Multi cooker properly and
if the plug is inserted firmly into the power outlet.
The light is defective. Take the appliance to your
Philips dealer or a service center authorized by
Philips.
The rice is not cooked.
There is not enough water. Add water according to
the scale on the inside of the inner pot.
Make sure that there is no foreign residue on the
heating element and the outside of the inner pot
before switching the Multi cooker on.
The heating element is damaged, or the inner pot
is deformed. Take the Multi cooker to your Philips
dealer or a service center authorized by Philips.
The rice is too dry and
not well cooked.
Add more water to the rice, and cook for a bit
longer.
The Multi cooker
does not switch to
the keep-warm mode
automatically.
You might have pressed the keep-warm button
before pressing the start button. In this case the
Multi cooker will be in standby mode after the
cooking is finished.
The temperature control is defective. Take the
appliance to your Philips dealer or a service center
authorized by Philips.
The rice is scorched.
You have not rinse the rice properly. Rinse the rice
until the water runs clear.
Water spills out of the
Multi cooker during
cooking.
Make sure that you add water to the level indicated
on the scale inside the inner pot that corresponds
to the number of cups of rice used.
Rice smells bad after
cooking.
Clean the inner pot with some washing detergent
and warm water.
After cooking, make sure the steam vent cap, inner
lid and inner pot is cleaned thoroughly.
Български
1 Важно
Преди да използвате многофункционалния уред за готвене, прочетете
внимателно това ръководство за потребителя и го запазете за справка в
бъдеще.
Опасност
•
Уредът не трябва да се потапя.
Предупреждение
•
Този уред не трябва да се използва от деца на възраст от 0 до 8 години.
•
Този уред може да се използва от деца на възраст над 8 години,
ако са под непрекъснат надзор и ако са под наблюдение или са
инструктирани относно безопасното използване на уреда и разбират
свързаните с това опасности.
•
Този уред може да се използва от хора с намалени физически
възприятия или умствени недостатъци или без опит и познания, ако
са под наблюдение или са инструктирани за безопасна употреба на
уреда и са разбрали евентуалните опасности.
•
Пазете уреда и захранващия кабел далече от достъп на деца на
възраст под 8 години.
•
Почистване и поддръжка на уреда може да се извършва от деца на
възраст над 8 години и под родителски надзор.
•
Не позволявайте на деца да си играят с уреда.
•
Този уред трябва да се разположи стабилно, като дръжките (ако има
такива) се разполагат така, че да се избегне разливането на горещи
течности.
•
Този уред е предназначен да се използва за домакински и подобни
цели, например:
•
В кухненски зони за персонала в магазини, офиси и други работни
помещения;
•
Ферми;
•
От клиенти в хотели, мотели и други подобни жилищни
помещения;
•
В места за нощуване и закуска.
•
Ако комплектът захранващи кабели е повреден, той трябва да бъде
заменен с комплект кабели, предлагани от производителя.
•
Уредът не е предназначен за използване с външен таймер или
отделна система за дистанционно управление.
•
Преди да включите уред в контакта, проверете дали посоченото
върху него захранващо напрежение отговаря на това на местната
електрическа мрежа.
•
Не оставяйте захранващия кабел да виси през ръба на масата или
работната повърхност, върху която е поставен уредът.
•
Проверете дали нагревателният елемент и външната страна на
вътрешния съд са чисти и сухи, преди да включите щепсела в контакта.
•
Не включвайте уреда в контакта и не натискайте никой от бутоните на
контролния панел с мокри ръце.
•
ПРЕДУПРЕЖДЕНИЕ: Ако искате да избегнете потенциална опасност, не
допускайте разливане върху захранващия конектор.
•
ПРЕДУПРЕЖДЕНИЕ: Винаги следвайте инструкциите и използвайте
правилно уреда с цел избягване на потенциално нараняване.
•
Съгласно инструкциите, описани в това ръководство за употреба,
използвайте мека и влажна кърпа, за да почистите повърхностите,
които са в контакт с храна, и не забравяйте да отстраните всички
остатъци от храна, залепнали по уреда.
•
Не поставяйте захранващия кабел под уреда, докато се използва.
•
Когато поставяте кошницата за готвене на пара, избягвайте да
докосвате страничната стена на вътрешния съд, в противен случай
това може да причини деформация поради висока температура.
Внимание
•
ВНИМАНИЕ: Повърхността на нагревателния елемент се нагрява от
остатъчна топлина след употреба.
•
Никога не използвайте аксесоари или части от други производители или
такива, които не са конкретно препоръчвани от Philips. При използване
на такива аксесоари или части вашата гаранция става невалидна.
•
Не излагайте уреда на високи температури и не го поставяйте върху
работеща или все още гореща готварска печка.
•
Не излагайте уреда на пряка слънчева светлина.
•
Поставете уреда върху стабилна, хоризонтална и равна повърхност.
•
Винаги слагайте вътрешния съд в уреда, преди да поставите щепсела
в контакта и да включите уреда.
•
Не поставяйте вътрешния съд директно над открит пламък за готвене
на ориз.
•
Не използвайте вътрешния съд, ако е деформиран.
•
Външните повърхности може да се нагорещят, докато уредът работи.
Много внимавайте, когато докосвате уреда.
•
Пазете се от горещата пара, която излиза от отвора за пара по време
на готвене или от уреда, когато отворите капака. Дръжте настрана
ръцете и лицето си от уреда, за да избегнете парата.
•
Не вдигайте и не местете уреда по време на работа.
•
Не превишавайте максималното ниво на водата, обозначено на
вътрешния съд, за да избегнете преливане, което може да доведе до
потенциална опасност.
•
Не оставяйте кухненските прибори в съда по време на готвене,
поддържане на топлината или претопляне на ориз.
1
www.philips.com/welcome
User Manual
www.philips.com/welcome
Recipe Book
www.philips.com/welcome
Warranty
a
d
c
e
b
j
i
h
g
f
2
3
l
k
m
n
o
p
q
r
s
t
u
v
w
x
y
10
8
9
11
12
13
4
5
6
7
2
1
15
14
16
17
18
19
1/6
•
Използвайте само приложените кухненски прибори. Избягвайте
използването на остри прибори.
•
За да се избегнат драскотини, не се препоръчва да се готвят
ракообразни продукти и продукти с черупки. Преди да ги сготвите,
отстранете черупките им.
•
Не поставяйте метални предмети или несвойствени вещества в
парния отвор.
•
Не поставяйте магнитна субстанция върху капака. Не използвайте
уреда в близост до магнитна субстанция.
•
Винаги оставяйте уреда да изстине, преди да го почистите или
преместите.
•
Винаги почиствайте уреда след употреба. Не мийте уреда в
съдомиялна машина.
•
Винаги изключвайте щепсела от контакта, ако няма да използвате
уреда дълго време.
•
Ако уредът се използва неправилно или за професионални или
полупрофесионални цели, или ако се използва по начин, който не
е в съответствие с указанията в това ръководство за експлоатация,
гаранцията става невалидна и Philips отказва отговорност за каквито и
да е причинени щети.
Електромагнитни полета (EMF)
Този уред на Philips е в съответствие с нормативната уредба и всички
действащи стандарти, свързани с излагането на електромагнитни полета.
2 Вашият многофункционален уред за
готвене
Поздравяваме ви за покупката и добре дошли във Philips!
За да се възползвате изцяло от предлаганата от Philips поддръжка,
регистрирайте продукта си на
www.philips.com/welcome
.
3 Какво има в кутията (фиг. 1)
Главно устройство на
многофункционалния уред за готвене Мерителна чаша
2 в 1 лъжица за ориз и супа
Захранващ кабел
Кошница за задушаване на пара
Ръковод. за потребителя
Книга с рецепти
Гаранционна карта
4 Общ преглед (фиг. 2)
a
Капак
f
Електрически контакт
b
Подвижен вътрешен капак
g
Бутон за освобождаване на
капака
c
Вътрешен съд
h
Отвор за пара
d
Индикации за нивото на
водата
i
Капачка на отвора за пара
e
Контролен панел
j
Клапан за пара
Обзор на контролите (фиг. 3)
k
Бутон за готвене на
задушено
s
Дисплей за продължителност
l
Бутон за бавно готвене,
ниска температура
t
Бутон за избор на меню
m
Бутон за поддържане на
топлината/отмяна
u
Бутон за претопляне
n
Бутон за готвене на пара
v
Бутон за време за готвене/
отложен старт/избор на
температура
o
Бутон за бавно готвене,
висока температура
w
Бутон за потвърждаване
p
Бутон за печене
x
Бутон за сотиране
q
Индикатор на таймер
y
Бутон за избор на меню
r
Индикатор за отложен старт
Програма за готвене
Функция за
готвене
Функция за
допълнително
готвене
Време за
приготвяне по
подразбиране
Регулируемо
време за
приготвяне
Задушаване
Телешко филе (
)
120 минути
20 минути-4 часа
Месо/птици (
)
60 минути
20 минути-4 часа
Свинско месо (
)
120 минути
20 минути-4 часа
Агнешко месо (
)
120 минути
20 минути-4 часа
Морски дарове (
)
25 минути
20 минути-4 часа
Ръчно (
)
30 минути
20 минути-4 часа
Готвене на
пара
Телешко филе (
)
60 минути
5 – 120 минути
Месо/птици (
)
50 минути
5 – 120 минути
Свинско месо (
)
30 минути
5 – 120 минути
Агнешко месо (
)
40 минути
5 – 120 минути
Морски дарове (
)
20 минути
5 – 120 минути
Ръчно (
)
25 минути
5 – 120 минути
Бавно
готвене,
ниска
температура
Телешко филе (
)
12 часа
1 – 15 часа
Месо/птици (
)
10 часа
1 – 15 часа
Свинско месо (
)
10 часа
1 – 15 часа
Агнешко месо (
)
10 часа
1 – 15 часа
Морски дарове (
)
8 часа
1 – 15 часа
Ръчно (
)
2 часа
1 – 15 часа
Бавно
готвене,
висока
температура
Телешко филе (
)
6 часа
1 – 15 часа
Месо/птици (
)
4 часа
1 – 15 часа
Свинско месо (
)
4 часа
1 – 15 часа
Агнешко месо (
)
4 часа
1 – 15 часа
Морски дарове (
)
2 часа
1 – 15 часа
Ръчно (
)
2 часа
1 – 15 часа
Печене
Телешко филе (
)
50 минути
10 – 120 минути
Месо/птици (
)
30 минути
10 – 120 минути
Свинско месо (
)
25 минути
10 – 120 минути
Агнешко месо (
)
50 минути
10 – 120 минути
Морски дарове (
)
20 минути
10 – 120 минути
Ръчно (
)
20 минути
10 – 120 минути
Ориз
45 минути
няма данни
Супа
90 минути
20 минути-4 часа
Овесена каша
25 минути
10 минути-2 часа
Боб
80 минути
1-2 часа
Зелеви сърми
50 минути
20 – 59 минути
Кисело мляко
8 часа
6-12 часа
Сотиране
30 минути
10 – 59 минути
Претопляне
25 минути
5 – 59 минути
Запазване на топлината
24 часа
няма данни
5 Използване на многофункционалния уред
за готвене
Преди първата употреба
1
Извадете всички аксесоари от вътрешния съд. Махнете опаковъчния
материал на вътрешния съд.
2
Преди първата употреба сварете вода и почистете
многофункционалния уред за готвене.
3
Почистете основно всички части, преди да го използвате за първи път
(вижте глава "Почистване и поддръжка").
Забележка
•
Уверете се, че всички части са напълно сухи, преди да започнете да
използвате многофункционалния уред за готвене.
•
Уверете се, че външната повърхност на вътрешния съд е суха и чиста
и че няма остатъци от вътрешната страна на уреда.
Подготовка преди готвене
Предупреждение
•
Уверете се, подвижният вътрешен капак е монтиран правилно.
English 1
Български
1
Čeština
1
Eesti
1
Magyar 2
Қазақ
2
Lietuviškai
2
Latviešu
2
Македонски
3
Polski
3
Română
3
Русский
3
Slovensky
4
Shqip
4
Українська
4
Azərbaycan
5
Հայերեն
5
ქართული
5
Кыргызча
5
Тоҷикӣ
6
Türkmençe
6
O’zbek
6
Nadal masz pytania?Nie znalazłeś odpowiedzi w instrukcji lub masz inne problemy? Zadaj pytanie w poniższym formularzu i opisz szczegółowo swoją sytuację, aby inni użytkownicy i eksperci mogli udzielić ci odpowiedzi. Jeśli wiesz, jak rozwiązać problem innej osoby, podziel się swoją wiedzą :)


