
Ardo DP23SA Zamrażarka – Instrukcja obsługi w formacie pdf, czytaj online za darmo. Mamy nadzieję, że okaże się ona pomocna w przypadku jakichkolwiek pytań związanych z użytkowaniem urządzenia.
Jeśli nadal masz wątpliwości, zadaj pytanie w komentarzach pod instrukcją.
"Ładowanie instrukcji" oznacza, że musisz poczekać na pobranie pliku, aby móc go przeczytać online. Niektóre instrukcje są bardzo obszerne, a czas ich ładowania zależy od szybkości łącza internetowego.


10
RUSSO
IT
GB
526
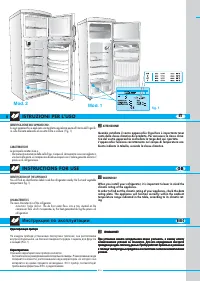
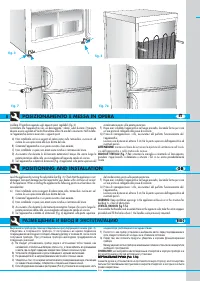
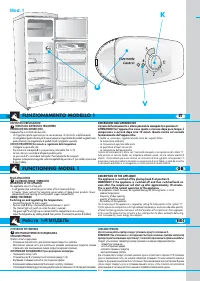
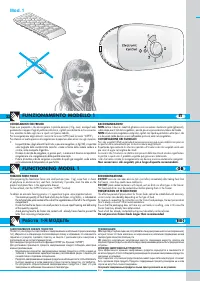
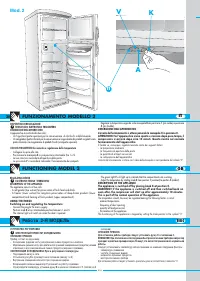
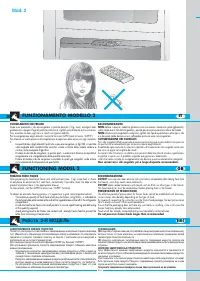
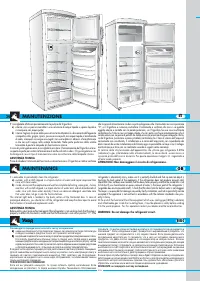
POSIZIONAMENTO E MESSA IN OPERA MODELLO 1
POSITIONING AND INSTALLATION MODEL 1
àÁÏÂÌÂÌË ̇ԇ‚ÎÂÌËfl ÓÚÍ˚‚‡ÌËfl ‰‚ÂÂÈ
àÁÏÂÌÂÌË ̇ԇ‚ÎÂÌËfl ÓÚÍ˚‚‡ÌËfl ‰‚ÂÂÈ
àÁÏÂÌÂÌË ̇ԇ‚ÎÂÌËfl ÓÚÍ˚‚‡ÌËfl ‰‚ÂÂÈ
àÁÏÂÌÂÌË ̇ԇ‚ÎÂÌËfl ÓÚÍ˚‚‡ÌËfl ‰‚ÂÂÈ
àÁÏÂÌÂÌË ̇ԇ‚ÎÂÌËfl ÓÚÍ˚‚‡ÌËfl ‰‚ÂÂÈ
ÇÒ ÏÓ‰ÂÎË Ô‰̇Á̇˜ÂÌ˚ ‰Îfl ËÁÏÂÌÂÌËfl ̇ԇ‚ÎÂÌËfl ÓÚÍ˚‚‡ÌËfl ‰‚ÂÂÈ, ˜ÚÓ
Ó·ÂÒÔ˜˂‡ÂÚ Ì‡ËÎÛ˜¯Â ÒÓ˜ÂÚ‡ÌËÂ Ò Ó·ÒÚ‡ÌÓ‚ÍÓÈ ÍÛıÌË. ÑÎfl ÁÚÓ„Ó ‰ÂÈÒÚ‚ÛÈÚÂ
ÒÎÂ‰Û˛˘ËÏ Ó·‡ÁÓÏ: ÓÒÚÓÓÊÌÓ ÔÓÎÓÊË‚ ıÓÎÓ‰ËθÌËÍ Ì‡ Á‡‰Ì˛˛ ÒÚÂÌÍÛ, Ë
ÔÓÎÓÊË‚ ÒÔˆˇθÌ˚ ÔӉͷ‰ÍË ‚Ó ËÁ·ÂʇÌË ‡Á‰‡‚ÎË‚‡ÌËfl ÍÓ̉ÂÌÒ‡ÚÓ‡ Ë
ÔÓ‚ÂʉÂÌËfl ÍÓÏÔÂÒÒÓÌÓÈ „ÛÔÔ˚, ‚˚ÔÓÎÌËÚ ÒÎÂ‰Û˛˘ÂÂ:
A-ü åéÑÖãú
A-ü åéÑÖãú
A-ü åéÑÖãú
A-ü åéÑÖãú
A-ü åéÑÖãú
Ä
ÄÄ
ÄÄ ëÌfl‚ ÔÂÚβ (2), ÓÒ‚Ó·Ó‰ËÚ ‰‚¸ (3).
Å
ÅÅ
ÅŠ쉇ÎËÚ ‰‚‡ ‚ËÌÚ‡, Á‡ÍÂÔÎfl˛˘Ë ÔÓÏÂÊÛÚÓ˜ÌÛ˛ ÔÂÚβ (4) Ë ÓÒ‚Ó·Ó‰ËÚ ‰‚¸ (5).
Ç
ÇÇ
ÇÇ éÚ‚ËÌÚËÚ ÓÒ¸ (6) Ë ÛÒÚ‡ÌÓ‚ËÚ Âfi ̇ ÎÂ‚Û˛ ÔÂÚβ.
ÉÉÉÉÉ ëÌËÏËÚÂ Ò Ó·ÂËı ‰‚ÂÂÈ ‚ÚÛÎÍË Ë ÒÓÓÚ‚ÂÚÒÚ‚Û˛˘Ë Á‡„ÎÛ¯ÍË Ò ÓÚ‚ÂÒÚËÈ, Ë
ÛÒÚ‡ÌÓ‚ËÚ Ëı ̇ ÔÓÚË‚ÓÔÓÎÓÊÌÛ˛ ÒÚÓÓÌÛ (‚ÚÛÎÍË Ì‡Î‚Ó, Á‡„ÎÛ¯ÍË Ì‡Ô‡‚Ó).
Ñ. èÓÒΠ˝ÚÓ„Ó ÛÒÚ‡ÌÓ‚ËÚ ̇ ÏÂÒÚÓ ‚ÂıÌ˛˛ ‰‚¸ (5).
ÖÖÖÖÖ á‡ÍÂÔËÚ ÔÓÏÂÊÛÚÓ˜ÌÛ˛ ÔÂÚβ (4), ‡ Ú‡ÍÊ ÌËʇÒÔÓÎÓÊÂÌÌÛ˛ Ô·ÒÚχÒÒÓ‚Û˛
Ô·ÒÚËÌÛ Ò ÔÓÚË‚ÓÔÓÎÓÊÌÓÈ ÒÚÓÓÌ˚, ‰Îfl ·ÎÓÍËÓ‚ÍË ‰‚ÂË.
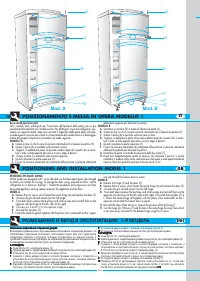
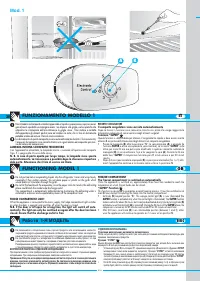
РАЗМЕЩЕНИЕ И ВВОД В ЭКСПЛУАТАЦИЮ 1-Я МОДЕЛЬ
›
››
›› ìÒÚ‡ÌÓ‚ËÚ ‰‚¸ ̇ ÏÂÒÚÓ, ËÁÏÂÌË‚ ÔÓÎÓÊÂÌË ‚ÚÛÎÍË (7).
Ü
Ü
Ü
Ü
Ü ìÒÚ‡ÌÓ‚ËÚ ÔÓÒÚ‡‚ÎflÂÏÛ˛ ÌËÊÌ˛˛ ÔÂÚβ ‰Îfl ·ÎÓÍËÓ‚ÍË ‰‚ÂË.
B-ü åéÑÖãú
B-ü åéÑÖãú
B-ü åéÑÖãú
B-ü åéÑÖãú
B-ü åéÑÖãú
Ä
ÄÄ
ÄÄ ëÌfl‚ ÔÂÚβ (2), ÓÒ‚Ó·Ó‰ËÚ ‰‚¸ (3).
Å
ÅÅ
ÅŠ쉇ÎËÚ ‰‚‡ ‚ËÌÚ‡, Á‡ÍÂÔÎfl˛˘Ë ÔÓÏÂÊÛÚÓ˜ÌÛ˛ ÔÂÚβ (4) Ë ÓÒ‚Ó·Ó‰ËÚ ‰‚¸ (5).
Ç
ÇÇ
ÇÇ éÚ‚ËÌÚËÚ ÓÒ¸ (6) Ë ÛÒÚ‡ÌÓ‚ËÚ Âfi ̇ ÎÂ‚Û˛ ÔÂÚβ.
ÉÉÉÉÉ ëÌËÏËÚÂ Ò Ó·ÂËı ‰‚ÂÂÈ ‚ÚÛÎÍË Ë ÒÓÓÚ‚ÂÚÒÚ‚Û˛˘Ë Á‡„ÎÛ¯ÍË Ò ÓÚ‚ÂÒÚËÈ, Ë
ÛÒÚ‡ÌÓ‚ËÚ Ëı ̇ ÔÓÚË‚ÓÔÓÎÓÊÌÛ˛ ÒÚÓÓÌÛ (‚ÚÛÎÍË Ì‡Î‚Ó, Á‡„ÎÛ¯ÍË Ì‡Ô‡‚Ó).
Ñ. èÓÒΠ˝ÚÓ„Ó ÛÒÚ‡ÌÓ‚ËÚ ̇ ÏÂÒÚÓ ‚ÂıÌ˛˛ ‰‚¸ (5).
ÖÖÖÖÖ á‡ÍÂÔËÚ ÔÓÏÂÊÛÚÓ˜ÌÛ˛ ÔÂÚβ (4), ‡ Ú‡ÍÊ ÌËʇÒÔÓÎÓÊÂÌÌÛ˛ Ô·ÒÚχÒÒÓ‚Û˛
Ô·ÒÚËÌÛ Ò ÔÓÚË‚ÓÔÓÎÓÊÌÓÈ ÒÚÓÓÌ˚, ‰Îfl ·ÎÓÍËÓ‚ÍË ‰‚ÂË.
›
››
›› ìÒÚ‡ÌÓ‚ËÚ ‰‚¸ ̇ ÏÂÒÚÓ, ËÁÏÂÌË‚ ÔÓÎÓÊÂÌË ‚ÚÛÎÍË (7).
Ü
Ü
Ü
Ü
Ü èÓ‚ÂÌÛ‚ ÔÂÚβ (2) ÌÂÓ·ıÓ‰ËÏ˚Ï Ó·‡ÁÓÏ, ÒÌÓ‚‡ ÛÒÚ‡ÌÓ‚ËÚ ÓÒ¸ (1), ÔÓÒΠ˜Â„Ó
ÒÌÓ‚‡ ÛÒÚ‡ÌÓ‚ËÚ ÌÓÊÍÛ ‚ ÚÓ Ê ҇ÏÓ „ÌÂÁ‰Ó ÔÂÚÎË, Ò ÍÓÚÓÓ„Ó ‚˚ Âfi ÒÌflÎË.
èÓÒΠ˝ÚÓ„Ó Á‡ÍÂÔËÚ ÌËÊÌ˛˛ ÔÂÚβ ‰‚ÛÏfl ‚ËÌÚ‡ÏË.2-ü
2-ü
2-ü
2-ü
2-ü
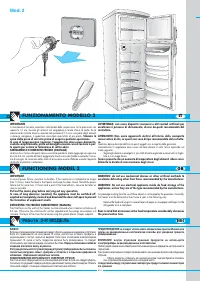
Reversibilità apertura porte
Tutti i modelli sono, predisposti per l’inversione dell’apertura delle porte, per un più
coordinato allineamento con l’arredo cucina. Per effettuare l’inversione delle porte, pro-
cedere nel seguente modo: dopo aver coricato il frigorifero dalla parte dello schienale,
usando appositi spessori per evitare lo schiacciamento del condensatore e il danneggia-
mento del gruppo compressore procedere nel modo seguente:
MODELLO A
A.
Svitare le due viti che fissano la cerniera intermedia (4) e liberare la portina (5).
B.
Svitare il perno (6) e montarlo sulla cerniera sinistra.
C.
Togliere, in ambedue le porte, le bussole e relativi tappi dai rispettivi fori e rimon-
tare il tutto sul lato opposto (bussole a sinistra, tappi a destra).
D.
Svitare il perno 2 e montarlo sulla cerniera opposta.
E.
Quindi rimontare la porta superiore (5).
F.
Fissare la cerniera intermedia (4) unitamente alla piastrina in plastica sottostante
dalla parte opposta per bloccare la portina.
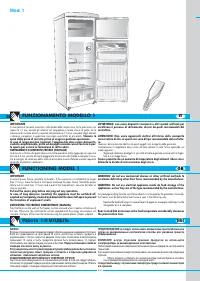
MODELLO B
A.
Smontare la cerniera (2) in modo di liberare la porta (3).
B.
Svitare le due viti che fissano la cerniera intermedia (4) e liberare la portina (5).
C.
Svitare il perno (6) e montarlo sulla cerniera sinistra.
D.
Togliere, in ambedue le porte, le bussole e relativi tappi dai rispettivi fori e rimon-
tare il tutto sul lato opposto (bussole a sinistra, tappi a destra).
E.
Quindi rimontare la porta superiore (5).
F.
Fissare la cerniera intermedia (4) unitamente alla piastrina in plastica sottostante
dalla parte opposta per bloccare la portina.
G.
Rimontare la porta invertendo la posizione della bussolina (7).
H.
Dopo aver opportunamente girato la cerniera (2) rimontare il perno (1), quindi
rimontare il piedino nella stessa sede cerniera, dal quale e stato opportunamente
rimosso. Bloccare quindi la cerniera inferiore con le 2 viti.
REVERSING THE DOOR SWING
All the models are equipped with | reversible doors so the door opening can be changed
to match your kitchen furnishings. To change the door swing, proceed as follow: set the
refrigerator on its back on i the floor. | Protect the condenser and compressor unit from
being damaged by inserting spacers between the appliance and the floor
MODEL A
A.
Remove the two screws which fasten the centre hinge (4) and remove the door (5).
B.
Unscrew the pin (6) and mount it on the left hinge.
C.
From both doors remove the bushings and relative caps and reinstall them on the
opposite side (bushings to the left, caps to the right).
D.
Unscrew pin 2 and fit it to the opposite hinge.
E.
Reinstall the top door (5).
F.
Fasten the center hinge (4) together with the plastic shim underneath on the | oppo-
site side to hold the freezer door in place.
MODEL B
A.
Remove the hinge (2) and the door (3).
B.
Remove the two screws which fasten the centre hinge (4) and remove the door (5).
C.
Unscrew the pin (6) and mount it on the left hinge.
D.
From both doors remove the bushings and relative caps and reinstall them on the
opposite side (bushings to the left, caps to the right). E Reinstall the top door (5). 6
F. Fasten the center hinge (4) together with the plastic shim underneath on the |
opposite side to hold the freezer door in place.
G.
Reinstall the door When doing so, reverse the position of the bushing (7)
H.
Turn the hinge (2), fit the pin (1) and the foot in the same hinge housing i from which
it was previously removed Fix the bottom hinge using the 2 screws.
Mod. A
3
7
2
4
6
5
Mod. B
3
7
1
4
6
5
2
Nadal masz pytania?Nie znalazłeś odpowiedzi w instrukcji lub masz inne problemy? Zadaj pytanie w poniższym formularzu i opisz szczegółowo swoją sytuację, aby inni użytkownicy i eksperci mogli udzielić ci odpowiedzi. Jeśli wiesz, jak rozwiązać problem innej osoby, podziel się swoją wiedzą :)