

Cata Neblia 600 Inox Okap – Instrukcja obsługi w formacie pdf, czytaj online za darmo. Mamy nadzieję, że okaże się ona pomocna w przypadku jakichkolwiek pytań związanych z użytkowaniem urządzenia.
Jeśli nadal masz wątpliwości, zadaj pytanie w komentarzach pod instrukcją.
"Ładowanie instrukcji" oznacza, że musisz poczekać na pobranie pliku, aby móc go przeczytać online. Niektóre instrukcje są bardzo obszerne, a czas ich ładowania zależy od szybkości łącza internetowego.


DECORATIVE EXTRACTOR HOODS
Dear client,
We are sure that the purchase of our extractor hood will fully satisfy all of your needs.
Please read this instruction manual carefully in order to obtain the best results from the use of the hood.
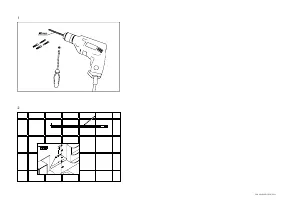
INSTRUCTIONS FOR INSTALLATION, MAINTENANCE AND USE
General indications
Before installing and using the hood, be sure that the voltage (V) and the frequency (Hz) indicated on the feature plate match
the voltage and frequency at the installation site.
The feature plate and technical data are shown on the inside of the product.
For better performance in extracting fumes we advise that tubing installed should be of a diameter not less than 120 mm. We
also advise using rigid PVC tubing.
ELECTRICAL CONNECTION
Connect the cord to a socket or double pole switch, which must have a minimum contact opening distance of 3 mm.
The manufacturer shall not be liable for failure to observe all safety regulations in force for the correct and normal operation of
electrical parts.
This hood complies with European Directives EMC No. 89/336 EEC on protection against radial interference.
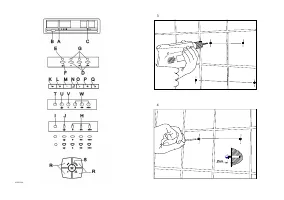
CONTROL PANELS:
All of the figures of the control panels can be found on the penultimate page.
Slider control panel
This panel is located on the lower part of the hood and includes:
-
4 position motor control switch (OFF, 1
st
, 2
nd
and 3
rd
speed positions) (Ref. A).
-
Motor control light (Ref. B).
-
Light switch (Ref. C).
Electronic switch control panel
This panel is located on the front part of the hood and includes:
-
3 position motor control switch (1st, 2nd, and 3rd speed) (Ref. D).
-
Lighting control lamp. Fig. 6. (Ref. E).
-
Motor control lights. (Ref. G).
-
Light switch (Ref. F).
TIMING
: To operate the canopy timer, having selected the speed, press the button for two seconds until the LED light blinks.
The timer will then work for 15 minutes.
At the end of this time, the motor will stop and the light will go out. If it is still on, and you wish to cancel the timing, press the
timer button once and the motor will stop.
Four-speed control panel with digital indicator
This panel is situated on the front of the extractor and includes:
-
Button for the light (ref. K).
-
On/off button of the motor (ref. L).
-
Button for reducing the motor speed (ref. M).
-
Motor speed indicator (ref. N).
-
Button for increasing the motor speed (ref. O).
-
Button for directly activating the TURBO speed of the motor (ref. P).
-
Button for setting the timer of the motor (ref. Q).
The extractor will operate for 5 minutes at the current speed and 5 minutes at each of the lower speeds until coming to a
complete stop.
Five-button control panel
This panel is situated on the front of the extractor and includes:
-
3 control switches for the motor (speed positions 1, 2 and 3) (ref W)
-
Off button of the motor (ref V)
-
On/off light of the motor (ref T)
-
Light switch (ref. U)
Mechanical push Four-button control panel:
This panel is located on the front part of the hood and includes:
-
3 position motor control switch (1st, 2nd, and 3rd speed) (Ref. H).
-
Motor control light (Ref. I).
-
Light switch (Ref. J).
NOTE:
To operate at the 2nd and 3rd speeds, the first speed must be activated.
Kontrollpanel med fyra hastigheter
Den här panelen finns på fläktens främre del och består av:
-
4 knappar för kontroll av motordriften (position 1, 2, 3 och turbo) (Ref R)
-
Strömbrytare
till
belysning.
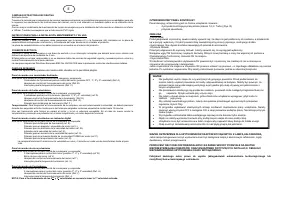
UNDERHÅLL
- Rengöring.
Före varje typ av åtgärd, bör du försäkra dig om att nätkabeln inte är inkopplad och att strömbrytaren är frånslagen.
Rengör den yttre delen med icke korrosivt flytande rengöringsmedel och använd aldrig slipande
rengöringsprodukter.
- Utbyte av lampan.
Innan du byter ut lampan, bör du försäkra dig om att köksfläkten inte är påkopplad. Ta bort fettfiltren och byt ut
lampan mot en lampa med samma effekt som den som anges vid de tekniska data. Sätt tillbaka filtren på samma
plats.
- Rengöring av fettfilter.
Minst varje månad och beroende på hur ofta fläkten används, bör fettfiltren monteras ner och rengöras i diskmaskin
eller med varmt vatten och rengöringsmedel. Om man rengör dem i diskmaskin bör de placeras i stående position
för att undvika att matrester avlagras på dem. Efter att ha sköljt och torkat filtren sätter man tillbaka dem igen på
samma plats genom att gå tillväga på det motsatta sättet än när man tog bort dem.
VIKTIG INFORMATION ANGÅENDE KÖKSFLÄKTAR MED HALOGENA LAMPOR
Vid utbyte av halogena lampor bör dessa bytas ut mot lampor med aluminium reflektor, aldrig mot dikroiska lampor,
för att undvika en onödig överhettning i lamphållaren.
TILLVERKAREN AVSÄGER SIG ALLT ANSVAR I DEN MÅN ATT MAN INTE VIDTAR ALLA ÅTGÄRDER
BESKRIVNA FÖR INSTALLATION, UNDERHÅLL OCH ANVÄNDNING AV KÖKSFLÄKTEN.
Om du behöver någon typ av teknisk assistans eller vill ha mer information om våra produkter, tveka inte att ta
kontakt med en av våra auktoriserade återförsäljare.
TILLVERKARE fiirbehåller sig rätten lill tekniska fiirbättringar eller modijieringar utan fiiregående meddelande.
VIKTIGT:
•
Anslut inte fläkten till skorsten, luftkonditionerigssystem eller varmluftstrummor. Innan den kopplas till
lufttrumman, var god ta reda på gällande kommunala förordningar angående luftutsläpp och begär
tillstånd hos den fastighetsansvarige. Försäkra dig om att ventilationen är korrekt även i fall då fläkten
används tillsammans med annan utrustning.
•
Lämna aldrig stekpannor och grytor på plattan utan tillsyn när du steker eftersom stekoljan kan överhettas
och fatta eld. Om matoljan används på nytt är risken för självantändning större.
•
Använd aldrig köksfläkten i utrymmen där det redan fungerar andra installationer som har
luftevakueringsbehov om man inte kan försäkra sig om en perfekt ventilation av det nämnda utrymmet.
•
För att elimimera riken för brand bör alla dessa råd och den periodiskt återkommande rengöringen av
fettfiltren följas noggrant.
•
Under en elektrostatisk överbelastning (ESD) är det möjligt att den här apparaten slutar fungera. Stäng då
av den (OFF) och sätt på den igen (ON), då börjar den fungera korrekt igen. Det finns inte eller kommer
att finnas någon som helst risk.
•
Om nätkabeln förstörs eller har ett fel bör den bytas ut på en auktoriserad serviceverkstad eller av ett
auktoriserat ombud.
•
Tänd aldrig lågor under fläkten.
•
Apparaten bör placeras på så sätt att strömförsörjningen är åtkomlig.
•
Fläkten bör installeras minst 65 cm från spisens övre del.
GB
Nadal masz pytania?Nie znalazłeś odpowiedzi w instrukcji lub masz inne problemy? Zadaj pytanie w poniższym formularzu i opisz szczegółowo swoją sytuację, aby inni użytkownicy i eksperci mogli udzielić ci odpowiedzi. Jeśli wiesz, jak rozwiązać problem innej osoby, podziel się swoją wiedzą :)


