Melitta Optima Timer - Instrukcja obsługi
Ekspres do kawy Melitta Optima Timer – Instrukcja obsługi, czytaj za darmo online w formacie PDF. Mamy nadzieję, że to pomoże rozwiązać wszelkie problemy, które mogą się pojawić. Jeśli masz dodatkowe pytania, skontaktuj się z nami za pomocą formularza kontaktowego.


Spis treści:
- Strona 30 – Wskazówki bezpieczeństwa
- Strona 31 – PL
- Strona 42 – Podmienky záruky
DE Gebrauchsanleitung
GB Operating Instructions
FR Mode d`emploi
NL Gebruiksaanwijzing
IT Istruzioni d’uso
ES
Instruciones de Uso
DK
Brugsanvisning
SE
Bruksanvisning
NO
Bruksanvisning
FI
Käyttöohje
LT
Naudojimo instrukcija
CZ
Návod k použití
SK
Návod na použitie
PL
Instrukcja obsługi
RU
Руководство по эксплуатации
TR
Kullanım
KR
사용 설명서
T I M E R
1100067-03
DE
Gebrauchsanleitung
GB
Operating Instructions
FR
Mode d`emploi
NL
Gebruiksaanwijzing
IT
Istruzioni d’uso
ES
Instruciones de Uso
DK
Brugsanvisning
SE
Bruksanvisning
NO
Bruksanvisning
FI
Käyttöohje
LT
Naudojimo instrukcija
CZ
Návod k použití
SK
Návod na použitie
PL
Instrukcja obsługi
RU
Руководство
по эксплуатации
DE
GB
FR
NL
ES
IT
SE
DK
NO
FI
LT
CZ
SK
PL
RU
"Ładowanie instrukcji" oznacza, że należy poczekać, aż plik się załaduje i będzie można go czytać online. Niektóre instrukcje są bardzo obszerne, a czas ich ładowania zależy od prędkości Twojego internetu.
Podsumowanie
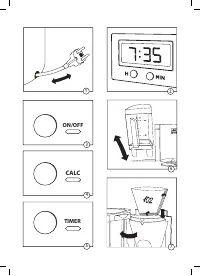
38 29 PL 28 • Ďalším krátkym stlačením tlačidla „TIMER“ funkciu aktivujete pre ďalší cyklus prípravy. Pri aktivácii sa rozsvieti modrá LED dióda a na displeji sa na nie- koľko sekúnd zobrazí čas štartu. • Časovač môžete vypnúť ďalším stlačením tlačidla „TIMER“. Modrá LED dióda zhasne. • Varenie kávy...
39 29 PL 28 • Ďalším krátkym stlačením tlačidla „TIMER“ funkciu aktivujete pre ďalší cyklus prípravy. Pri aktivácii sa rozsvieti modrá LED dióda a na displeji sa na nie- koľko sekúnd zobrazí čas štartu. • Časovač môžete vypnúť ďalším stlačením tlačidla „TIMER“. Modrá LED dióda zhasne. • Varenie kávy...
51 PL Warunki gwarancji Jeżeli niniejsze urządzenie zostało nabyte u autoryzowanego przedstawiciela firmy Melitta ® , to z uwagi na jego kompetencje doradcze oprócz prawa do roszczeń z tytułu gwarancji, które przysługuje użytkownikowi końcowemu względem sprzedawcy, objęte jest ono gwarancją producen...