Hotpoint-Ariston KIO 632 C C S - Instrukcja obsługi - Strona 5
Spis treści:
- Strona 7 – Beschrijving van het apparaat; Bedieningspaneel; Opis urz; Panel sterowania; Dit product voldoet aan de eisen die gesteld worden door; ść; BOOSTER; łą
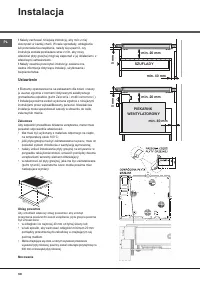
- Strona 8 – Instalacja; Ustawienie; patrz Zalecenia i srodki ostroznosci; Zabudowa; patrz rysunki; Obieg powietrza; Mocowanie; SZUFLADY
- Strona 10 – Intensywne gwizdanie:
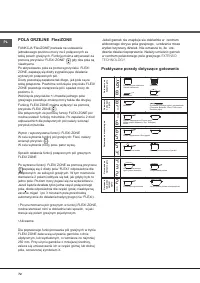
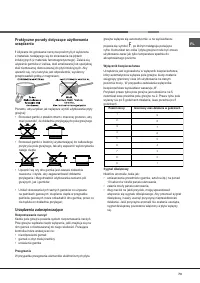
- Strona 12 – POLA GRZEJNE FlexiZONE; EXTENSO; Praktyczne porady dotycz
- Strona 14 – Ogólne zasady bezpiecze; patrz; Utylizacja
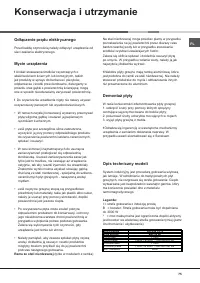
- Strona 15 – Konserwacja i utrzymanie; Rama ze stali nierdzewnej; ęż
GB
7
Description of the appliance
Control panel
GB
Description de l’appareil
Tableau de bord
FR
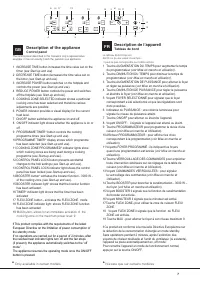
The control panel described in this manual is only a representative
example: it may not exactly match the panelon your appliance.
1 INCREASE TIME button increases the time value set on the
timer
(see Start-up and use)
.
2 DECREASE TIME button decreases the time value set on
the timer
(see Start-up and use)
.
3 INCREASE POWER button switches on the hotplate and
controls the power (
see Start-up and use
).
4 REDUCE POWER button controls the power and switches
off the hotplate (
see Start-up and use
).
5 COOKING ZONE SELECTED indicator shows a particular
cooking zone has been selected and therefore various
adjustments are possible.
6 POWER indicator provides a visual display for the current
heat level.
7 ON/OFF button switches the appliance on and off.
8 ON/OFF indicator light shows whether the appliance is on or
off.
9 PROGRAMME TIMER* button controls the cooking
programme times (
see Start-up and use
).
10 PROGRAMME TIMER* display shows which programme
has been selected (
see Start-up and use
).
11 COOKING ZONE PROGRAMMED* indicator lights show
which cooking zones are being used during a cooking
programme (
see Start-up and use
).
12 CONTROL PANEL LOCK button prevents accidental
changes to the hob settings (
see
Start-up and use
).
13 CONTROL PANEL LOCK indicator light shows the control
panel has been locked (
see Start-up and use
).
14 BOOSTER button* activates the booster function - 3000 W -
of the cooking zone
(see Start-up and use)
.
15 BOOSTER indicator light* shows that the booster function
has been activated.
16 TIMER* indicator light shows that the timer has been
activated
17 FLEXI ZONE button - activates the FLEXI ZONE mode
18 FLEXI ZONE indicator light shows FLEXI ZONE function
has been activated
19
MAX button- allows for an immediate activation of the
cookinfg zone on the maximum power level: 9
!
This product complies with the requirements of the latest
European Directive on the limitation of power consumption of
the standby mode.
If no operations are carried out for a period of 2 minutes, after
the residual heat indicator lights turn off and the fan stops
(if present), the appliance automatically switches to the “off
mode”.
The appliance resumes the operating mode once the ON/OFF
button is pressed.
Le tableau de bord qui est
décrit n.a qu.une valeur d.exemple :
il peut ne pas correspondre au modèle acheté
.
1 Touche AUGMENTATION DU TEMPS pour augmenter le temps
du programmateur
(voir Mise en marche et utilisation)
.
2 Touche DIMINUTION DU TEMPS pour diminuer le temps du
programmateur
(voir Mise en marche et utilisation)
.
3 Touche AUGMENTATION DE PUISSANCE pour allumer le foyer
et régler sa puissance (
voir Mise en marche et utilisation
).
4 Touche DIMINUTION DE PUISSANCE pour régler la puissance
et éteindre le foyer (
voir Mise en marche et utilisation
).
5 Voyant
FOYER SELECTIONNÉ pour signaler que le foyer
correspondant a été sélectionné et que les régulations sont
donc possibles.
6 Indicateur de PUISSANCE : une colonne lumineuse pour
signaler le niveau de puissance atteint.
7 Touche ON/OFF pour allumer ou éteindre l’appareil.
8 Voyant ON/OFF : il signale si l’appareil est allumé ou éteint.
9 Touche PROGRAMMATEUR pour programmer la durée d’une
cuisson (
voir Mise en marche et Utilisation
).
10 Af
fi
cheur PROGRAMMATEUR : pour af
fi
cher les choix
correspondant à la programmation (
voir Mise en marche et
utilisation
).
11 Voyants FOYER PROGRAMMÉ : ils indiquent les foyers
quand une programmation est lancée (
voir Mise en marche et
utilisation
).
12 Touche VERROUILLAGE DES COMMANDES pour empêcher
toute intervention extérieure sur les réglages de la table de
cuisson (
voir
Mise en marche et Utilisation
).
13 Voyant COMMANDES VERROUILLÉES : pour signaler
le verrouillage des commandes (
voir Mise en marche et
Utilisation
).
14 Touche BOOSTER pour brancher la suralimentation - 3000 W –
du foyer (
voir Mise en marche et utilisation
).
15 Voyant BOOSTER il signale que la fonction de suralimentation
du booster est activée.
16 Voyant MINUTEUR il signale que le minuteur est activé
17Touche FLEXI ZONE
-
pour utiliser la zone de cuisson FLEXI
ZONE
18
Voyant FLEXI ZONE il signale que la fonction du FLEXI
ZONE est activée.
19
Touche MAX - pour allumer le foyer à son niveau maximum 9.
!
Ce produit est conforme à la nouvelle Directive Européenne sur
la réduction de la consommation d’énergie en mode standby.
Sans opérations pendant 2 minutes, après l’extinction des
voyants de chaleur résiduelle et l’arrêt du ventilateur (si existants),
l’appareil se place automatiquement en „off mode”.
Pour remettre l’appareil en mode de fonctionnement normal,
appuyer sur la touche ON/OFF.
*
Only available in certain models.
*
N’existe que sur certains modèles
Booster
Max
Max
Booster
13
1
2
3
5
4
6
7
8
9
10 11
12
14
15
17
18
16
19
"Ładowanie instrukcji" oznacza, że należy poczekać, aż plik się załaduje i będzie można go czytać online. Niektóre instrukcje są bardzo obszerne, a czas ich ładowania zależy od prędkości Twojego internetu.
Podsumowanie
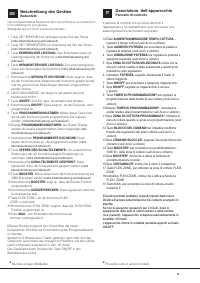
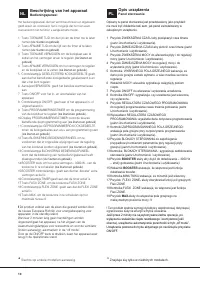
10 NL PL Beschrijving van het apparaat Bedieningspaneel Opis urz ą dzenia Panel sterowania Het bedieningspaneel dat hier wordt beschreven en afgebeeld geldt alleen als voorbeeld: het is mogelijk dat het niet exact overeenkomt met het door u aangeschafte model. 1 Toets TOENAME TIJD om de tijd van de ...
68 PL Instalacja ! Nale ż y zachowa ć niniejsz ą instrukcj ę , aby móc z niej skorzysta ć w ka ż dej chwili. W razie sprzeda ż y, odst ą pienia lub przeniesienia urz ą dzenia, nale ż y si ę upewni ć , czy instrukcja zosta ł a przekazana wraz z nim, aby nowy w ł a ś ciciel p ł yty grzejnej móg ł si ę...
70 PL Uruchomienie i u ż ytkowanie ! Klej stosowany do uszczelek pozostawia na szkle t ł uste plamy. Przed przyst ą pieniem do eksploatacji urz ą dzenia zaleca si ę usun ąć te plamy przy pomocy odpowiedniego produktu nieposiadaj ą cego w ł a ś ciwo ś ci ś ciernych. Podczas pierwszych godzin dzia ł a...
Inne modele płyty grzewcze Hotpoint-Ariston
-
 Hotpoint-Ariston KEM 645 D C(X)
-
 Hotpoint-Ariston KEM 646 D C
-
 Hotpoint-Ariston KIB 633 C E
-
 Hotpoint-Ariston KIB 644 C E
-
 Hotpoint-Ariston KIO 632 C C
-
 Hotpoint-Ariston KIO 633 T Z
-
 Hotpoint-Ariston KIX 633 C E
-
 Hotpoint-Ariston KIX 644 C E
-
 Hotpoint-Ariston KRA 631 T C S
-
 Hotpoint-Ariston KRA 640 B S (X S)