

Moulinex ME476132 Maszynka do mięsa – Instrukcja obsługi w formacie pdf, czytaj online za darmo. Mamy nadzieję, że okaże się ona pomocna w przypadku jakichkolwiek pytań związanych z użytkowaniem urządzenia.
Jeśli nadal masz wątpliwości, zadaj pytanie w komentarzach pod instrukcją.
"Ładowanie instrukcji" oznacza, że musisz poczekać na pobranie pliku, aby móc go przeczytać online. Niektóre instrukcje są bardzo obszerne, a czas ich ładowania zależy od szybkości łącza internetowego.


10
11
Af ter having soaked the sausage casings in warm water to make them supple, thread them on the funnel
leaving 5 cm extra (later, you will close the opening by tying a knot with a thread). Slide the knot up to the
end of the nozzle so that air is not trapped in the casing. Activate the appliance, feed the mincer with your
preparation and make sure the casings are being filled properly.
Note: This job is most easily done by two people. One will feed the prepared meat into the machine and
the other one will hold the sausages as they get filled.
Make your sausages as long as you wish by pinching and turning the casings.
In order to obtain a good shape to the sausage, make sure that no air remains trapped inside the casings
while they are being filled, and make them between 10 and 15 cm long (separate the sausages by tieing a
thread between them and make a knot with it).
KEBBE ACCESSORY (fig. 3.1 and 3.2)
Practical tip:
To make finely minced meat for Kebbe or Kefta, pass the meat 2 or 3 times through the grinder until
you obtain the desired texture.
BISCUIT ACCESSORY (fig. 4.1 and 4.2)
Prepare the dough. For best results, use a soft dough. Choose the design by aligning it with the arrow.
Repeat the process until you have obtained the desired amount of biscuits.
STEAK ACCESSORY (fig. 5)
VEGETABLE PRESSING ACCESSORY (fig. 6.1 and 6.2)
COULIS ACCESSORY (fig. 7)
Use :
Place a container under the juice groove
(K5)
to collect the juice and another one at the end of the
filter to collect any residues. If you wish to make coulis or juice, using fresh fruits only is an imperative.
According to the season and to the quality of your fruits, we recommended that you run the pulp through a
second time to extract the maximum possible amount of coulis or juice.
Juice:
Use filter
K3
Coulis:
Use filter
K4
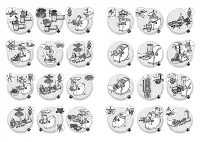
VEGETABLE CUTTER (fig. 8.1 to 8.6)
Use the cone specified for each type of food: See chart on fig. 10
Useful tips for best results:
The ingredients that you use must be firm and vegetables and fruit fresh, to obtain satisfactory results
and to avoid the accumulation of food in the compartment. Do not use the appliance to grate or cut food
products that are too hard like sugar cubes or pieces of meat.
CLEANING (fig. 9.1 to 9.6)
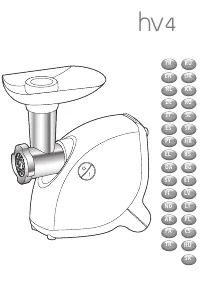
OMSCHRIJVING
A
Afneembare hakkop
A1
Aluminium middenstuk
A2
Schroef
A3
Slijpbaar, roestvrijstalen mes
A4
Roosters (afhankelijk van het model)
A4a
Rooster met kleine gaatjes - voor zeer fijn
hakken
A4b
Rooster met gemengde gaatjes - voor fijn
hakken
A4c
Rooster met grote gaatjes - voor grof hakken
A5
Aluminium moer
B
Afneembare schaal
C
Duwstaaf voor vlees
D
Aan/uit-knop
E
Motorblok
F
Accessoire voor worst (afhankelijk van het model)
G
Accessoire voor kebab (afhankelijk van het model)
G1
Verdeelstuk
G2
Ring
H
Accessoire voor koekjes (afhankelijk van het model)
H1
Houder
H2
Vorm
I
Accessoire voor steak (afhankelijk van het model)
I1
Vormbasis
I2
Vorm voor vis
I3
Vorm voor steak
I4
Vorm voor nuggets
I5
Sapopvangbak
J
Accessoire voor citruspers (afhankelijk van het
model)
J1
Kogel / Filter
J2
Aandrijfas
J3
Sapopvangbak
K
Accessoire voor coulis (afhankelijk van het model)
K1
Dichtingsring
K2
Schroef
K3
Filter met kleine gaatjes voor het sap
K4
Filter met gemengde gaatjes voor de coulis
K5
Sapgeleider
K6
Schoonmaakborstel
L
Groentesnijder (afhankelijk van het model)
L1
Magazijn voor kegels/vulschacht
L2
Duwstaaf
L3
Kegels (afhankelijk van het model)
L3a
Kegel voor grof raspen (rood)
L3b
Kegel voor fijn raspen (oranje)
L3c
Kegel voor grof snijden (donker groen)
L3d
Kegel voor fijn snijden (licht groen)
L3e
Kegel om friet te snijden
L3f
Accessoire om blokjes te snijden
M/N
Opbergaccessoire (afhankelijk van het model)
GEBRUIKSTIPS
Maak alle accessoires met zeepwater schoon voor het eerste gebruik. Spoel de accessoires en droog ze
onmiddellijk zorgvuldig af.
Het rooster en het mes moeten vet blijven. Vet ze in met olie.
Laat uw apparaat niet leeg aanstaan als de roosters niet zijn ingevet.
Steek nooit uw vingers of andere voorwerpen in de vulschacht.
Laat het apparaat nooit langer dan 14 min. draaien.
GEBRUIK: HAKKOP (cf. fig. 1.1 tot 1.4)
Maak al het voedsel dat u wilt hakken klaar: verwijder de botten, het kraakbeen en de zenuwen. Snij het vlees
in stukken (ongeveer 2cm X 2cm).
Trucje
: Doe na het hakken enkele stukjes brood in het apparaat zodat alle gehaktrestjes uit het apparaat
komen.
ACCESSOIRE VOOR WORST (cf. fig. 2.1 tot 2.3)
Belangrijk:
dit accessoire mag enkel worden gebruikt met gehakt, gekruid en gemengd vlees.
Laat de slang eerst weken in lauw water om ze elastisch te maken en schuif ze vervolgens op de trechter. Laat
5 cm ruimte aan het uiteinde van de slang (leg een knoop in de slang op 5 cm van het uiteinde). Zet het
apparaat aan, doe het gehakt in de hakker en rol de slang af naarmate deze wordt gevuld.
Opmerking: dit werk is eenvoudiger als iemand u helpt: één persoon zorgt voor de toevoer van het
NL
Nadal masz pytania?Nie znalazłeś odpowiedzi w instrukcji lub masz inne problemy? Zadaj pytanie w poniższym formularzu i opisz szczegółowo swoją sytuację, aby inni użytkownicy i eksperci mogli udzielić ci odpowiedzi. Jeśli wiesz, jak rozwiązać problem innej osoby, podziel się swoją wiedzą :)


