Electrolux XXLBOX14 - Instrukcja obsługi - Strona 8
 2
2
 3
3
 4
4
 5
5
 6
6
 7
7
 8
8
 9
9
 10
10
 11
11
 12
12
 13
13
 14
14
 15
15
 16
16
 17
17
 18
18
 19
19
 20
20
 21
21
 22
22
 23
23
 24
24
 25
25
 26
26
 27
27
 28
28
 29
29
 30
30
 31
31
 32
32
 33
33
 34
34
 35
35
 36
36
 37
37
 38
38
 39
39
 40
40
 41
41
 42
42
 43
43
 44
44
 45
45
 46
46
 47
47
 48
48
 49
49
 50
50
 51
51
 52
52
 53
53
 54
54
 55
55
 56
56
 57
57
 58
58
 59
59
 60
60
 61
61
 62
62
 63
63
 64
64
 65
65
 66
66
 67
67
 68
68
 69
69
 70
70
 71
71
 72
72
 73
73
 74
74
 75
75
 76
76
 77
77
 78
78
 79
79
 80
80
 81
81
 82
82
 83
83
 84
84
 85
85
 86
86
 87
87
 88
88
 89
89
 90
90
 91
91
 92
92
 93
93
 94
94
 95
95
 96
96
 97
97
 98
98
 99
99
 100
100
 101
101
 102
102
 103
103
Spis treści:
- Strona 62 – Polski; Przed uruchomieniem odkurzacza; Česky; Před uvedením do provozu
- Strona 64 – Uzyskiwanie najlepszych rezultatów; Dosažení nejlepších výsledků
- Strona 72 – Wymiana filtrów; Výměna filtrů
- Strona 74 – Czyszczenie węża i ssawek; Czyszczenie ssawki do odkurzania twardych; Čištění hadice a hubice; Čištění hubice na podlahovou krytinu
- Strona 76 – Usuwanie usterek; Odstraňování závad
8
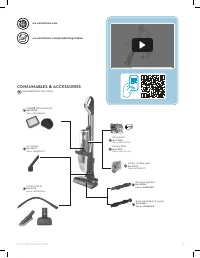
* Certain models only. ** Execution depending on technology
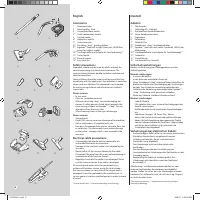
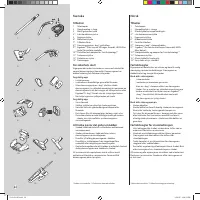
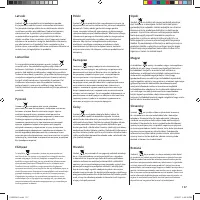
English
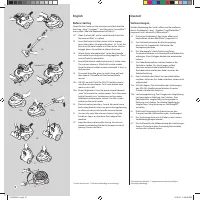
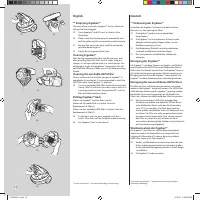
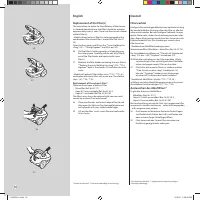
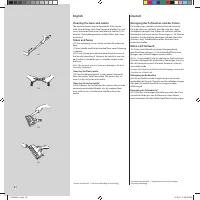
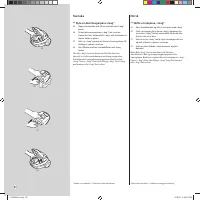
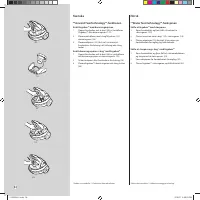
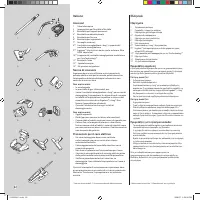
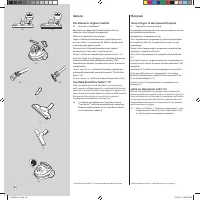
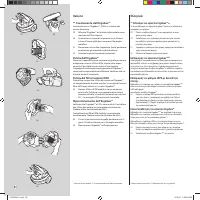
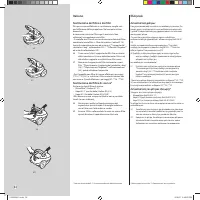
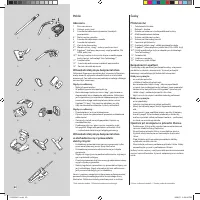
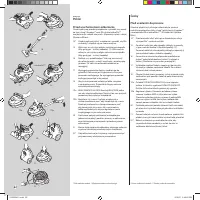
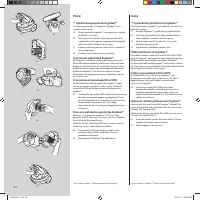
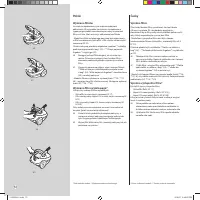
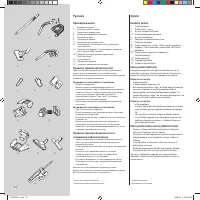
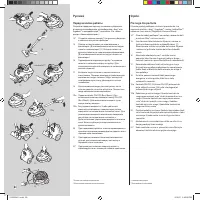
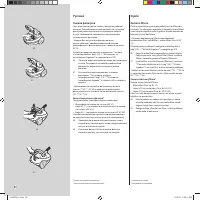
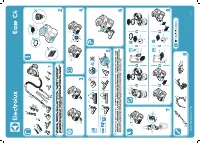
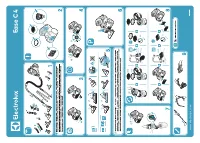
Before starting
Open the front cover on the machine and check that the
dust bag, s-bag® / Ergobox™ , and the motor-/microfilter**
are in place. (See also Replacement of filter(s))
14* Open the back lid* on the machine and check that
the exhaust filter* is in place.
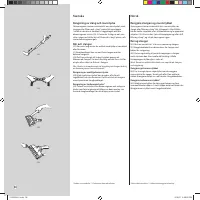
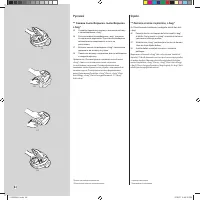
15 Insert the hose until the catches click to engage
(press the catches to release the hose). (2). Insert the
hose into the hose handle until the catches click to
engage (press the catches to release the hose).
16 Attach the or telescopic tube* to the hose handle
and nozzle by pushing and twisting together. (Twist
and pull apart to dismantle.)
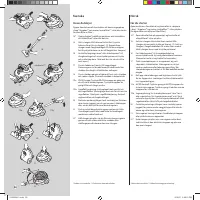
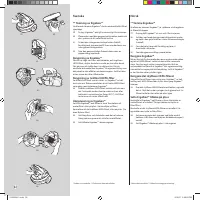
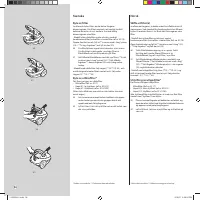
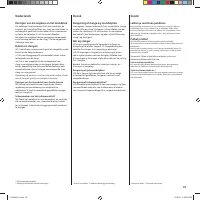
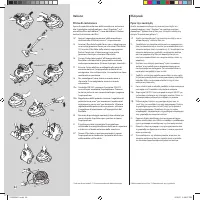
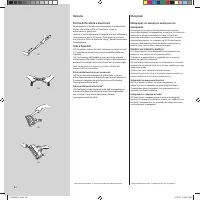
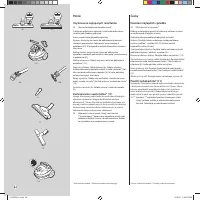
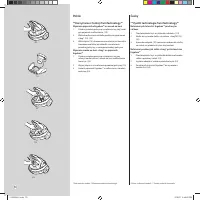
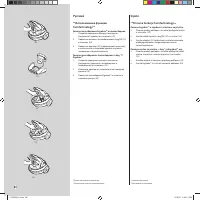
17 Extend the electric cable and connect it to the mains.
The vacuum cleaner is fitted with a cable winder.
Once the electric cable has been extended, it stays in
that position.
18 To rewind the cable, give it a slight sharp pull and
then release. The cable will then automatically
rewind.
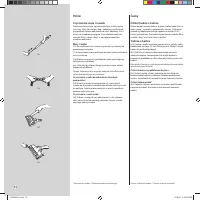
19a ON/OFF control: Push the ON-OFF button once to
start the vacuum cleaner. Push same button once
more to turn it off.
19b Power Regulation: Twist the power control towards
„max” to increase the suction power. Twist the power
control towards „min” to decrease suction power.
Additional suction power control: Use the suction
control on the hose handle.
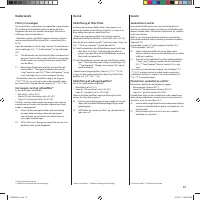
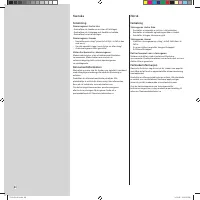
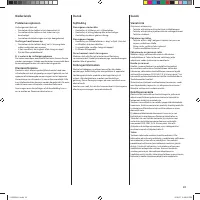
20 Practical parking positions (and at the same time a
backsaving feature) when you pause during cleaning
or when you carry and store the vacuum cleaner.
21 You can also carry the vacuum cleaner using the
handle on top or on the lower front edge of the
machine.
22* Keep the hose in place while storing the vacuum
cleaner by extending the elastic bumper cord and
placing it across the hose
cordmatic™
14.
15.
16.
17.
18.
19a.
19b.
21.
22.
20.
Deutsch
Vorbereitungen
Vordere Abdeckung des Geräts öffnen und kontrollieren,
ob ein Staubbeutel, s-bag® / Ergobox™ und Motorfilter**
eingesetzt sind (siehe auch „Filterwechsel“.)
14
Die hintere Abdeckung* des Geräts öffnen und
kontrollieren, ob der Abluftfilter* eingesetzt ist.
15
Den Schlauch einsetzen, bis die Verriegelung
einrastet. Zur Freigabe des Schlauches die
Verriegelung drücken.
16
Das Teleskoprohr* durch Drehen und festes
Zusammenschieben an Schlauchgriff und Bodendüse
anbringen. (Zum Zerlegen drehen und auseinander
ziehen.)
17
Das Kabel herausziehen und den Stecker in die
Steckdose stecken. Der Staubsauger verfügt
über eine automatische Kabelaufwicklung.
Nach dem Herausziehen des Kabels arretiert die
Kabelaufwicklung.
18
Zum Aufwickeln des Kabels kurz am Kabel ziehen
und dann loslassen. Das Kabel wird dann automatisch
aufgewickelt.
19a EIN/AUS-Regler: Zum Einschalten des Staubsaugers
den EIN/AUS-Schalter einmal drücken. Erneutes
Drücken schaltet das Gerät aus.
19b Leistungsregulierung: Zum Steigern der Saugleistung
Leistungsregler in Richtung „max“ drehen. Zum
Reduzieren der Saugleistung Leistungsregler in
Richtung „min“ drehen. Zusätzliche Regelung der
Saugleistung: Saugsteuerung am Schlauchgriff*
einstellen.
20
Praktische Parkposition für Arbeitspausen, den
Transport und die Aufbewahrung des Staubsaugers.
21
Der Staubsauger kann am Griff oder an der unteren
Vorderkante getragen werden.
22* Den Schlauch für die Aufbewahrung des Staubsaugers
fixieren. Dazu elastischen Gummizug herausziehen
und um den Schlauch ziehen.
* Nur bestimmte Modelle. ** Vorgehensweise von der jeweiligen
Technologie abhängig
2192924-01.indd 8
2/13/07 4:39:46 PM
"Ładowanie instrukcji" oznacza, że należy poczekać, aż plik się załaduje i będzie można go czytać online. Niektóre instrukcje są bardzo obszerne, a czas ich ładowania zależy od prędkości Twojego internetu.
Podsumowanie
6 miejscu. Polski Przed uruchomieniem odkurzacza Otwórz pokrywę przednią urządzenia i sprawdź, czy worek na kurz s-bag®/Ergobox™ oraz filtr silnika/mikrofiltr** znajduja sie na swoich miejscach. (Zapoznaj się też z sekcją Wymiana filtrów).14* Otwórz pokrywę tylną* urządzenia i sprawdź, czy filtr wy...
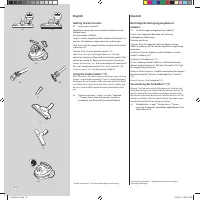
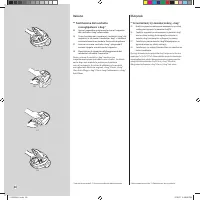
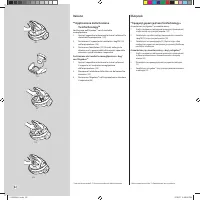
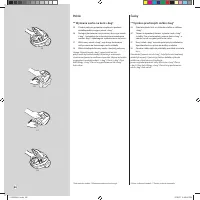
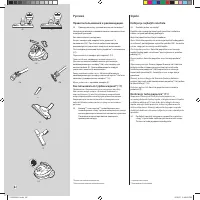
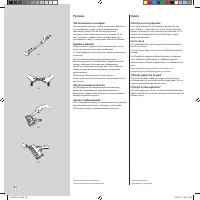
64 Polski Uzyskiwanie najlepszych rezultatów 23 Akcesoria dołączone do odkurzacza*Ssawka do odkurzania tapicerki i ssawka do odkurzania szczelin pod składaną pokrywą.Stosuj ssawki takie jak podano poniżej: Dywany: Korzystaj ze ssawki do odkurzania dywanów/ twardych powierzchni z dźwignią* przestawi...
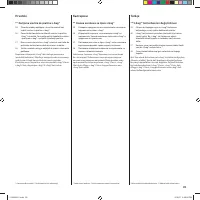
7 Polski Wymiana filtrów Im częstsze opróżnianie, tym większa wydajność odkurzacza. W przypadku korzystania z urządzenia w typowym gospodarstwie domowym należy wymieniać filtry co 3 lata. Nie korzystaj z odkurzacza bez filtrów.- Model bez filtra wylotowego powinien być wyposażony w filtr kombinowany...
Inne modele odkurzacze Electrolux
-
 Electrolux EC41-2SW
-
 Electrolux EC41-4T
-
 Electrolux EC41-ANIM
-
 Electrolux EC41-H2SW
-
 Electrolux EER73DB
-
 Electrolux EER73IGM
-
 Electrolux PC91-8STM
-
 Electrolux PD91-8SSM
-
 Electrolux PF91-4ST
-
 Electrolux PI91-5SGM PUREi9