Skil 502 - Instrukcja obsługi - Strona 7

Spis treści:
- Strona 11 – BAKIM; Uniwersalny laser poziomujàcy
- Strona 12 – KONSERWACJA
- Strona 13 – GWARANCJA / ÂRODOWISKO; Лазерный уровень для
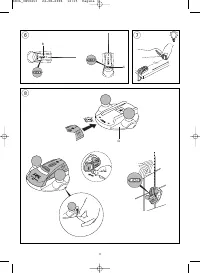
- level the tool (ensure that the bubble in the relevant
level is centered)
-
use projected line as reference
●
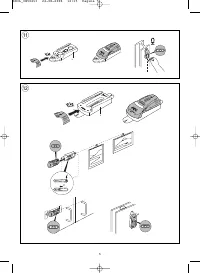
Screw accessory L
@
For projecting lines at the same level as already
mounted screw
- place accessory L over already mounted screw
- slide accessory L to the left/right, so that screw ends
up firmly in tapered end of peg
- slide tool on accessory L
- level the tool (ensure that the bubble in the relevant
level is centered)
- use projected line as reference for mounting other
screw(s)
Screw accessory L can also be used in combination with
tape or drawing-pins
●
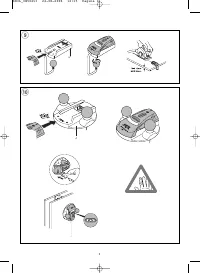
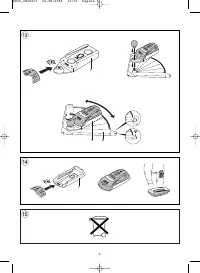
Pivot accessory M
#
For projecting lines at an angle (for rough indication only)
- remove knob by turning it counter-clockwise
- slide tool on magnet accessory K
- fasten magnet accessory K on accessory M by
turning knob clockwise
- move tool over graduated arc by loosening/fastening
knob
Pivot accessory M can also be used in combination with
tape or drawing-pins
●
Belt clip accessory N
$
For easy and convenient storage
MAINTENANCE
●
Do not expose the tool to continuous vibration or
extremely hot or cold temperatures
●
Always store the tool indoors in its protective
carton/case
●
Always keep the tool free of dust, moisture and direct
sunlight
●
Clean the tool with a damp cloth and mild soap
! always remove the batteries before cleaning the
lens
●
Do not disassemble or modify the tool in any way
●
Do not attempt to change any part of the laser lens
GUARANTEE / ENVIRONMENT
●
This Skil product is guaranteed in accordance with
statutory/country-specific regulations; damage due to
normal wear and tear, overload or improper handling will
be excluded from the guarantee
●
In case of a complaint, send the tool undismantled together
with proof of purchase to your dealer or the nearest Skil
service-station (addresses as well as the service diagram
of the tool are listed on www.skileurope.com)
●
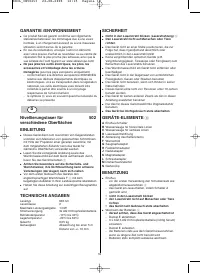
Do not dispose of electric tools, batteries,
accessories and packaging together with household
waste material
(only for EU countries)
- in observance of European Directive 2002/96/EC on
waste of electric and electronic equipment and its
implementation in accordance with national law,
electric tools that have reached the end of their life
must be collected separately and returned to an
environmentally compatible recycling facility
- symbol
%
will remind you of this when the need for
disposing occurs
Niveau laser toutes surfaces
502
INTRODUCTION
●
Cet outil est conçu pour aligner des objets et/ou
marquer des lignes de coupe par projection d’un
faisceau laser; les accessoires fournis permettent de
l’utiliser sur les surfaces les plus diverses
●
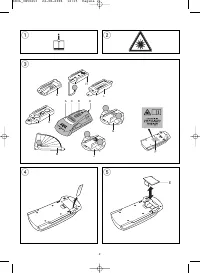
Lisez soigneusement ce mode d'emploi ainsi que
l'étiquette d'avertissement située sur l'outil avant
d'utiliser l'outil
1
●
Prêtez attention aux consignes de sécurité et aux
avertissements; sinon, vous risquez d'endommager
gravement vos yeux
●
Avant d’utiliser cet outil pour la première fois, collez
l’autocollant fourni dans votre langue sur le texte anglais
de l’étiquette d’avertissement F
3
●
Conservez ce mode d'emploi pour vous y reporter à
l'avenir
SPECIFICATIONS TECHNIQUES
Type de laser
635 nm
Catégorie de laser
2
Puissance de sortie maximale
1 mW
Alimentation
3 piles plates AG13
Température en fonctionnement
-10°C à 40°C
Température d’entreposage
-20°C à 60°C
Poids
0,05 kg
Exactitude
déviation de +/- 10 mm
à une distance de
5 mètres
SECURITE
●
Ne projetez pas le rayon laser dans vos yeux
(rayonnement laser)
2
●
Ne dirigez pas le rayon laser vers des personnes ou
des animaux
●
Ne placez pas cet outil dans une position où le rayon
laser pourrait atteindre l'œil d'une personne,
volontairement ou non
●
N'utilisez pas d'outils optiques grossissants (loupes,
télescopes ou jumelles) pour voir le rayon laser
●
Veillez à ne pas enlever l'étiquette d'avertissement de
l'outil ni à l'endommager
●
N'utilisez pas cet outil en la présence de liquides
inflammables, de gaz ou de poussière
●
N'utilisez pas cet outil en la présence d'enfants
●
Cet outil ne doit pas être utilisé par des personnes de
moins de 16 ans
●
N'utilisez pas cet outil dans un but autre que ceux
mentionnés dans ce mode d'emploi
●
Utilisez seulement les accessoires d'origine prévus pour
cet outil
●
Mettez toujours l'outil hors tension lorsqu'il n'est
pas utilisé
F
8
SKIL_IB502v3 22-08-2006 12:15 Pagina 8
"Ładowanie instrukcji" oznacza, że należy poczekać, aż plik się załaduje i będzie można go czytać online. Niektóre instrukcje są bardzo obszerne, a czas ich ładowania zależy od prędkości Twojego internetu.
Podsumowanie
● Pimli aksesuar J 0 Alç› levha, yumuflak tahta ve di¤er yumuflakmalzemelerde ›fl›n göndermek için- aleti J aksesuar›na kayd›rarak itin- J aksesuar›n› yüzeye yerlefltirin- aletin seviyesini ayarlay›n (ilgili su terazisindeki kabarc›¤›n ortalanm›fl oldu¤undan emin olun) - 2 topuzu bast›r›n- gönderilen ›fl›...
● Nie u˝ywaj ˝adnych optycznych przyrzàdówpowi´kszajàcych (jak soczewki powi´kszajàce,teleskopy lub lornetki) do spoglàdania w wiàzk´ lasera ● Nie usuwaj i nie niszcz ostrzegawczych znaków nanarz´dziu ● Nie u˝ywaj narz´dzia w obecnoÊci palnych cieczy,gazów lub py∏ów ● Nie u˝ywaj narz´dzia przy dziec...
● Zawsze przechowuj narz´dzie w pomieszczeniu, wpude∏ku/futerale ochronnym ● Podczas przechowywania zawsze chroƒ narz´dzieprzed zapyleniem, wilgocià i bezpoÊrednim Êwiat∏ems∏onecznym ● CzyÊç narz´dzie wilgotnà Êciereczkà i ∏agodnym myd∏em! zawsze przed czyszczeniem soczewek wyjmuj baterie ● W ˝aden ...