Segway AA.05.12.01.0004 - Instrukcja obsługi - Strona 4


Spis treści:
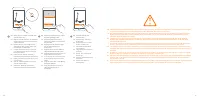
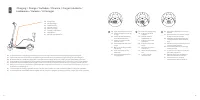
- Strona 3 – Montaż
- Strona 5 – Aktywacja
- Strona 10 – Ładowanie
- Strona 16 – Składanie
- Strona 19 – Funkcje aplikacji
- Strona 20 – CodeLock
- Strona 23 – cz lub Wył
1
4
3
2
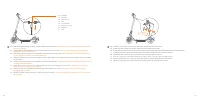
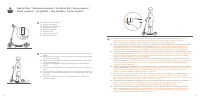
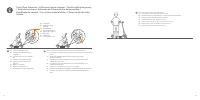
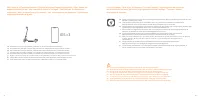
(5 ± 1 N·m)
EN
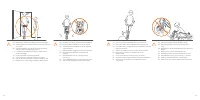
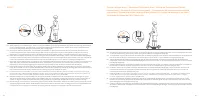
Slide the handlebar onto the stem with the headlight facing forward.
* Make sure that the wires inside the handle and the
stem are connected.
F R
Faites glisser le manche dans le tronc. Le feu avant doit etre fixé en face.
* Assurez-vous que les fils à l'intérieur de la
poignée et la tige sont connectés.
DE
Schieben Sie den Griff auf den Lenkervorbau. Der Scheinwerfer zeigt nach vorne.
* Stellen Sie sicher, dass die Drähte im
Inneren des Griffs und des Vorbaus verbunden sind.
I T
Collegare saldamente i fili all'interno della manubrio e dello stelo. Far scorrere l'impugnatura sullo stelo, con il faro diretto
verso l'esterno.
ES
Acopla el manillar a la barra. El faro delantero mirando hacia delante.
* Asegúrese de que los cables del interior del mango y
el vástago estén conectados.
P L
Nasuń kierownicę na kolumnę kierownicy. Reflektor powinien znajdować się z przodu.
* Upewnij się, że przewody
wewnątrz uchwytu i trzpienia są połączone.
NL Schuif het stuur en de kabels in de stuurstang met de koplamp naar voren.
* Zorg dat de kabels in het stuur en de
stuurstang zijn verbonden.
PT Deslize o guiador sobre a haste com o farol virado para a frente.
* Certifique-se de que os fios dentro do cabo e da haste
estão ligados.
EN
Headlight
F R
Feu avant
DE
Scheinwerfer
I T
Faro
ES
Faro delantero
P L
Reflektor przedni
NL Koplamp
PT Farol
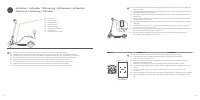
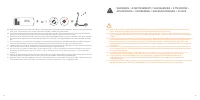
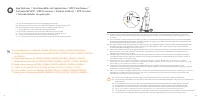
2
3
EN
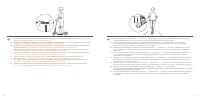
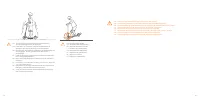
Install the 4 screws in order (two on each side) with the included hex wrench.
F R
Installez quatre vis (deux de chaque côté) avec la clé hexagonale incluse.
DE
Ziehen Sie die 4 Schrauben der Reihe nach (zwei auf jeder Seite) mit dem mitgelieferten Sechskantschlüssel an.
I T
Installare le quattro viti (due su ciascun lato) con la chiave esagonale inclusa nella confezione.
ES
Aprieta los cuatro tornillos (dos a cada lado) con la llave hexagonal incluida.
P L
Za pomocą załączonego klucza imbusowego wkręć cztery śruby (po dwie z każdej strony).
NL Monteer de 4 schroeven in volgorde (twee aan elke kant) met de meegeleverde inbussleutel.
PT
Instale os 4 parafusos em ordem (dois de cada lado) com a chave hexagonal incluída.
05
06
"Ładowanie instrukcji" oznacza, że należy poczekać, aż plik się załaduje i będzie można go czytać online. Niektóre instrukcje są bardzo obszerne, a czas ich ładowania zależy od prędkości Twojego internetu.
Podsumowanie
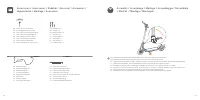
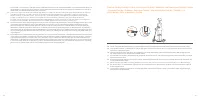
EN 7/64'' (3mm) Hex WrenchFR Clé hexagonale 7/64'' (3mm)DE 7/64'' (3mm) SechskantschlüsselI T 7/64'' (3mm) Chiave esagonaleES Llave hexagonal 7/64'' (3mm)PL 7/64'' (3mm) Klucz imbusowy NL 7/64'' (3mm) inbussleutel PT Chave hexagonal de 3 mm (7/64" ) EN M5 Screw × 5 FR Vis M5 × 5 DE M5 Schraube ×...
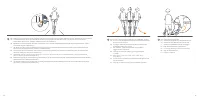
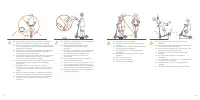
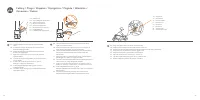
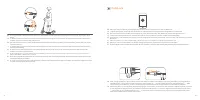
EN Charge Port F R Port de charge DE Ladeanschluss I T Porta di ricarica ES Puerto de carga P L Gniazdko ładowania NL OplaadpoortPT Porta de Carregamento Activation / Activation / Aktivierung / Attivazione / Activación/ Aktywacja / Activering / Ativação 2 EN An inactivated KickScooter will keep beep...
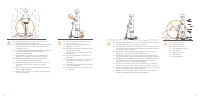
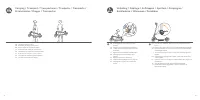
EN Charge Port F R Port de charge DE Ladeanschluss I T Porta di ricarica ES Puerto de carga P L Gniazdko ładowania NL OplaadpoortPT Porta de Carregamento Charging / Charge / Aufladen / Ricarica / Cargar la batería / Ładowanie / Oplader / A Carregar EN Your KickScooter is fully charged when the LED o...