
Condtrol Vector 30 Przyrząd pomiarowy – Instrukcja obsługi w formacie pdf, czytaj online za darmo. Mamy nadzieję, że okaże się ona pomocna w przypadku jakichkolwiek pytań związanych z użytkowaniem urządzenia.
Jeśli nadal masz wątpliwości, zadaj pytanie w komentarzach pod instrukcją.
"Ładowanie instrukcji" oznacza, że musisz poczekać na pobranie pliku, aby móc go przeczytać online. Niektóre instrukcje są bardzo obszerne, a czas ich ładowania zależy od szybkości łącza internetowego.
Congratulations on your purchase of laser distance meter Vector 30
CONDTROL.
Safety instructions can be found in the end of this user manual and should
be carefully read before you use the device for the first time.
SAFETY REGULATIONS
The user manual should be read carefully before you use the device for
the first time. Unintended use of the device can be dangerous for human’s
health and cause serious injury. Keep this user manual. If the device is given
to somebody for temporary use, be sure to enclose user manual to it.
- Do not misuse the device.
- Do not remove warning signs and protect them from abrasion, because
they contain information about safe operation of the device.
The device belongs to laser class 2 in accordance with EN60825-1.
Laser radiation!
Do not stare into beam
Class 2 laser
<1 mW 620-690nm
EN60825-1:2014
- Do not look into the laser beam or its reflection, with unprotected eye or
through an optical instrument. Do not point the laser beam at people or
animals without the need. You can dazzle them.
- To protect your eyes close them or look aside.
- It is prohibited to disassemble or repair the device yourself. Entrust the
device repair to qualified personnel and use original spare parts only.
- Do not use the device in explosive environment, close to flammable
materials.
- Avoid heating the batteries to avoid the risk of explosion and electrolyte
leakage. In case of liquid contact with skin, wash it immediately with soap
and water. In case of contact with eyes, flush with clean water during 10
minutes and consult the doctor.
INTENDED USE
Laser distance meter Vector 30 is intended to measure distance, to
calculate area and volume of measured objects and perform calculations
by and Pythagoras’ Theorem. The device is suitable for use at both indoor
and outdoor building areas.
T EC HNIC AL S PEC IFIC AT ION S
Measuring range*
0,05…30 m
Smallest unit displayed
1 mm
Measuring accuracy **
±3 mm
Laser
Class II, 620-690 nm, <1 mW
Continuous measurement
+
Addition/subtraction
+
Area/volume
+
Calculations by Pythagoras’ Theorem
+
Automatic shutdown of the laser
30 seconds
Automatic shutdown of the device
180 seconds
Battery life
Up to 5000 measurements
Storage temperature
-20…+70 °С
Operating temperature
0…+40 °С
Dust and water protection rate
IP54
Power supply
2 х 1.5V AAA LR03 (alkaline)
Dimensions
115х39х19 mm
Weight
42 g
* Use a target plate to increase the measurement range during daylight or
if the target has poor reflection properties.
** Accuracy can decrease under unfavorable conditions, such as intense
sunshine or when measurements are made against glossy or transparent
surfaces, moving objects, objects with rough surface or when laser beam
is reflected.
Vector 30
User manual
Laser distance meter
EN
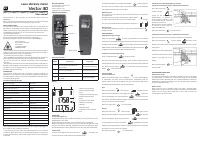
DELIVERY PACKAGE
1. Laser distance meter – 1 pc.
2. Hand strap – 1 pc.
3. User manual – 1 pc.
4. Batteries 2 x 1.5V AAA LR03
PRODUCT DESCRIPTION
Functions of buttons
Button
Short press
Long press
1
Switch on the device/ switch on
the laser beam/single distance
measurement
Continuous
measurement (tracking)
2
Area/volume/Pythagoras
Select measuring unit
3
Addition/subtraction
Select reference point
4
Delete the measurement result/exit
the mode
Switch off the device
Display
1. Main line for displaying
measurement/calculation
results
2. Additional line for displaying
measurement/calculation
results
3. Indication of the mode
4. Battery charge level
indication
5. Measuring unit
6. Indication of the reference
point
OPERATION
Insert/replace batteries
Remove the battery cover. Insert the batteries, observing correct polarity.
Put the battery cover back.
Replace the batteries as soon as the error 203 appears on the display.
Remove the batteries from the device if it’s not used for a long time to avoid
corrosion and battery discharge. All batteries must be replaced at the same
time. Both batteries must be of the same brand, with the same charge level.
Switch on/off
To switch on the device short press the button . The device will
switch on and enter single distance measurement mode.
To switch off the device press and hold the button during 3 seconds.
In order to save the battery power the device will switch off automatically
within 180 seconds after the last operation.
Reference point
It is possible to set the reference point either from the top or the bottom
end of the device.
The default reference point is the bottom end of the device.
To select the reference point press and hold the button during 2
seconds. Corresponding indicator will appear on the display – or .
Measuring unit
To select required measuring unit (m, in, ft) press and hold the button
during 2 seconds.
ME A SUREMEN T S
Single distance measurement
Short press the button to switch on the device. Laser beam will be
switched on automatically. Aim the laser beam at the object of measurement
and short press the button to make a single distance measurement.
Measurement result will appear on the display. Short press the button
to delete the result of measurement and exit the mode.
Continuous measurement (tracking)
Press and hold the button during 3 seconds.
The device will take measurements one after another, showing the last
measured value in the main line, and the previous measured value in the first
line. Short press the button to stop measuring. Short press the
button to exit the mode.
C ALCUL AT I ON S
Addition/subtraction
Make a measurement. Short press the button to select either addition
or subtraction, and make the 2nd measurement. Calculation result will
appear in the main line on the display. The next measurements will also be
added/subtracted to/from the next measuring result.
Area
Short press the button once. Symbol will appear on the
display. Laser beam will be on. Short press the button to measure
the 1st side (length). Short press the button to measure the 2nd
side (width). Area (composition of length and width) will be calculated and
appear in the main line on the display.
Short press the button to exit the mode.
Volume
Short press the button twice. Symbol will appear on the
display. Laser beam will be on. Short press the button to measure
the 1st side (length). Short press the button to measure the
2nd side (width). Short press the button to measure the 3rd side
(height). Volume (composition of length, width and height) will be calculated
and appear in the main line on the display.
Short press the button to exit the mode.
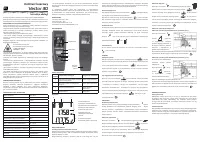
Indirect measurement by Pythagoras’ Theorem
Calculation of distance by using 2 additional measurements
Short press the button
3 times. Symbol will
appear on the display. Make
measurements of distance А
and В. Length of distance С will
be calculated and the result will
appear in the main line.
Distance В must be perpendicular
to distance С and cannot be
longer than distance А.
Short press the button to exit the mode.
Calculation of distance by using 3 additional measurements
Distance D can be measured by making 3 additional measurements.
Short press the button 4 times. Symbol will appear on the
display. Laser beam will be on. Make measurements of distances А, В and
С one by one.
After the last made measurement
calculation result (distance D) will
appear in the main line on the
display.
Short press the button to
exit the mode.
MEASUREMENT CONDITIONS
Measurement range
The maximum measurement range is 30 m. At night, at dusk, or if the object
of measurement is shaded, the measurement range can be increased
without the use of a reflective plate. Use a reflective plate to increase the
measurement range during daylight hours, or if the object being measured
has a poor reflective surface.
Object surface
When measuring up to colorless liquids (e.g. water), dust-free glass,
polystyrene or similar translucent and glossy surfaces, the measurement
results may be wrong. When measuring to very dark surfaces, the
measurement time may increase.
Display
Keyboard
Battery cover
1
3
4
2
1
2
3
4
5
6
Nadal masz pytania?Nie znalazłeś odpowiedzi w instrukcji lub masz inne problemy? Zadaj pytanie w poniższym formularzu i opisz szczegółowo swoją sytuację, aby inni użytkownicy i eksperci mogli udzielić ci odpowiedzi. Jeśli wiesz, jak rozwiązać problem innej osoby, podziel się swoją wiedzą :)


