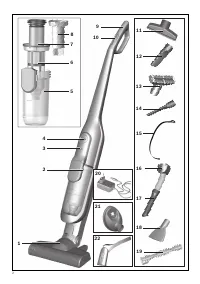
Bosch BCH86PETAU - Instrukcja obsługi - Strona 52
 2
2
 3
3
 4
4
 5
5
 6
6
 7
7
 8
8
 9
9
 10
10
 11
11
 12
12
 13
13
 14
14
 15
15
 16
16
 17
17
 18
18
 19
19
 20
20
 21
21
 22
22
 23
23
 24
24
 25
25
 26
26
 27
27
 28
28
 29
29
 30
30
 31
31
 32
32
 33
33
 34
34
 35
35
 36
36
 37
37
 38
38
 39
39
 40
40
 41
41
 42
42
 43
43
 44
44
 45
45
 46
46
 47
47
 48
48
 49
49
 50
50
 51
51
 52
52
 53
53
 54
54
 55
55
 56
56
 57
57
 58
58
 59
59
 60
60
 61
61
 62
62
 63
63
 64
64
 65
65
 66
66
 67
67
 68
68
 69
69
 70
70
 71
71
 72
72
 73
73
 74
74
 75
75
 76
76
 77
77
 78
78
 79
79
 80
80
 81
81
 82
82
 83
83
 84
84
 85
85
 86
86
 87
87
 88
88
 89
89
 90
90
 91
91
 92
92
 93
93
 94
94
 95
95
 96
96
 97
97
 98
98
 99
99
 100
100
 101
101
 102
102
 103
103
 104
104
 105
105
 106
106
 107
107
 108
108
 109
109
 110
110
 111
111
 112
112
 113
113
 114
114
 115
115
 116
116
 117
117
 118
118
 119
119
 120
120
 121
121
 122
122
52
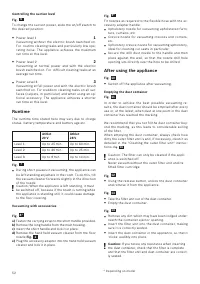
Controlling the
s
uction level
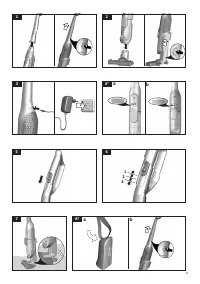
Fig.
6
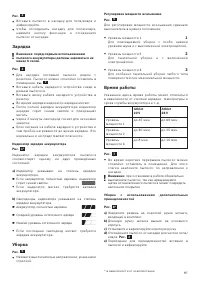
To change the suction power, slide the on/off switch to
the desired position:
Power level 1
1
Vacuuming without the electric brush switched on.
For routine cleaning tasks and par ticularly low ope -
rating noise. The appliance achieves the ma ximum
run time at this level.
Power level 2
2
Vacuuming at normal power and with the electric
brush switched on. For dif ficult cleaning tasks at an
average run time.
Power Level 3
3
Vacuuming at full power and with the electric brush
switched on. For stubborn cleaning tasks on all sur-
faces (carpets, in par ticular) and when using an op -
tional accessor y. The appliance achieves a shor ter
run time at this level.
R
unti
m
e
The runtime time stated here may var y due to charge
status, batter y temperature and batter y age etc.
Athlet
20 V
Athlet
28 V
Level 1:
Up to 4 5
min.
Up to 6 0
min.
Level 2:
Up to 3 0
min.
Up to 25
min.
Level 3:
Up to 8
min.
Up to 10
min.
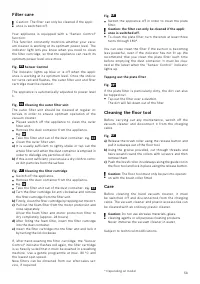
Fig.
7
During shor t pauses in vacuuming, the appliance can
be left standing any where in the room. To do this, tilt
the vacuum cleaner for wards slightly in the direction
of the nozzle.
!
Caution: When the appliance is left standing, it must
be switched off, because if the brush is turning while
the appliance is standing still, it could cause damage
to the floor covering.
Vacuu
m
ing with acce
ss
orie
s
Fig.
8*
a)
Fasten the carrying strap to the short handle provided.
b)
Remove the long handle from the main housing .
c)
Insert the short handle and lock it in place.
d)
Remove the hand-held vacuum cleaner from the floor
nozzle.
Fig.
2
e)
Plug the accessory adapter into the hand-held vacuum
cleaner and lock it in place.
Fig.
9*
Fit nozzles as required to the flexible hose with the ac-
cessor y adapter handle:
Upholster y nozzle for vacuuming upholstered furni-
ture, cur tains, etc.
Crevice nozzle for vacuuming crevices and corners,
etc.
Upholster y crevice nozzle for vacuuming upholster y,
ideal for cleaning car seats in par ticular
Secure the drill dust nozzle to the handle and then
place against the wall, so that the nozzle drill hole
opening sits directly over the hole to be drilled.
After u
s
ing the appliance
Fig.
10
Switch off the appliance after vacuuming.
E
m
ptying the du
s
t container
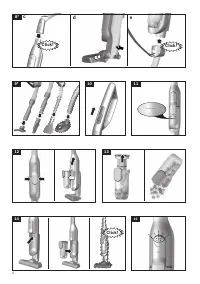
Fig.
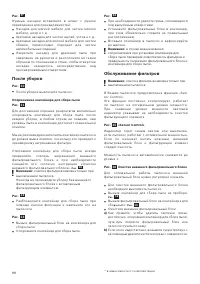
11
In order to achieve the best possible vacuuming re -
sults, the dust container should be emptied after ever y
use or, at the latest, when dust at one point in the dust
container has reached the marking.
We recommend that you not fill the dust container bey-
ond the marking, as this leads to considerable soiling
of the filter.
When emptying the dust container, always check how
dir ty the outer filter unit is and, if necessar y, clean it as
detailed in the "Cleaning the outer filter unit" instruc-
tions.
Fig.
16
!
Caution: The filter can only be cleaned if the appli-
ance is switched off.
Never vacuum without the outer filter unit and its
fitted filter car tridge.
Fig.
12
Using the release button, unlock the dust container
and remove it from the appliance.
Fig.
13
Take the filter unit out of the dust container.
Empty the dust container.
Fig.
14
Remove any dir t which may have been lodged under-
neath the container ejector opening.
Inser t the filter unit into the dust container, making
sure it is correctly seated.
Inser t the dust container in the appliance, so that it
'clicks' audibly into place.
!
Caution:
If you notice any resistance when inserting
the dust container, check that the filter is complete
and that the filter unit and dust container are correct-
ly seated.
* Depending on model
"Ładowanie instrukcji" oznacza, że należy poczekać, aż plik się załaduje i będzie można go czytać online. Niektóre instrukcje są bardzo obszerne, a czas ich ładowania zależy od prędkości Twojego internetu.
Inne modele odkurzacze Bosch
-
 Bosch BBH MOVE1
-
 Bosch BBH MOVE2
-
 Bosch BBH MOVE5
-
 Bosch BBH MOVE6
-
 Bosch BBHMOVE4AU
-
 Bosch BBS1224AU
-
 Bosch BBS611LAG
-
 Bosch BCH3PT25AU
-
 Bosch BCH6255NAU
-
 Bosch BCH65MSKAU